


19
Broil
Setting Oven Controls
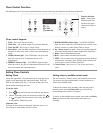
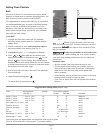
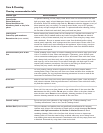
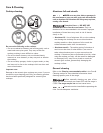
Suggested broil settings table (electric oven)
Food Rack position Setting Cook time in minutes
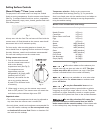
(See Fig. 1) 1st side 2nd side Doneness
Steak 1” thick 6th or 7th* Hi 6 4 Medium
Steak 1” thick 6th or 7th* Hi 7 5 Medium-well
Steak 1” thick 6th or 7th* Hi 8 7 Well
Pork chops 3/4” thick 6th Hi 8 6 Well
Chicken-bone in 5th Lo 20 10 Well
Chicken-boneless 6th Lo 8 6 Well
Fish 6th Hi - as directed - Well
Shrimp 5th Hi - as directed - Well
Hamburger 1” thick 6th or 7th* Hi 9 7 Medium
Hamburger 1” thick 6th Hi 10 8 Well
Fig. 3
Fig. 1
5
6
7
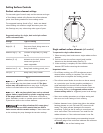
Should an oven fire occur, close the oven
door and turn the oven OFF. If the fire continues, use a fire
extinguisher.
DO NODO NO
DO NODO NO
DO NO
TT
TT
T put water or flour on the fire. Flour
may be explosive.
Important notes:
• Always arrange oven racks when the oven is cool.
• For best results when broiling, use a quality broil pan
along with a broil pan insert. A broil pan is designed to
drain the fat from the food, help avoid spatter and
reduce smoking.
• When broiling, always pull the oven rack out to the stop
position before turning or removing food.
• Cook Time or Delay Start will not operate with the Broil
function.
Always use pot holders or oven mitts when
using the oven. When cooking, the oven interior, exterior,
oven racks and cooktop will become very hot which can
cause burns
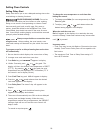
Fig. 2
Use the broil function to cook meats that require direct
exposure to flame heat for optimum browning results. The
Broil function is factory preset to broil at 550°F.
The suggested broil settings table (See Fig. 3) is provided
for recommendations only. Increase or decrease broiling
times, or move to a different rack position to suit for
doneness. If the food you are broiling is not listed in the
table, follow the instructions provided in your cookbook
and watch the item closely.
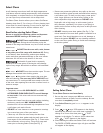
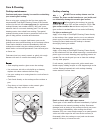
1. Arrange the oven racks when cool. For optimum
browning results, preheat oven for 5 minutes before
adding food.
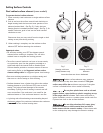
2. Position cookware in oven. Leave oven door open at
broil stop position when broiling (See Fig. 2).
3. Press Broil key pad. — — will appear in display.
4. Press
or key pad until the desired broil
setting level appears in the display. Press
for HI
broil or
for LO broil setting. Most foods may be
broiled at the HI broil setting. Select the LO broil setting
to avoid excess browning or drying of foods that should
be cooked to the well-done stage.
5. Broil on one side until food is browned. Turn and broil
food on 2nd side.
6. When finished broiling press
.
To cancel Broil at anytime press
.
To set Broil:
Cook times given are approximate and should be used only as a guide.
*Use the off-set rack only in rack position 7 (on some models).
some
models
4
3
2
1