


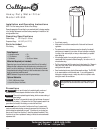

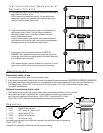

Installation
NOTE:
• Please read all instructions, specifications, and precautions before installing and using
your water filter.
• Install filter cartridge in housing before proceeding with installation (see Filter Cartridge
Replacement on page 3).
• Install filter after water meter or pressure tank.
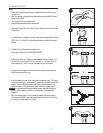
• Numbered diagrams correspond with numbered steps.
1. Apply about 12 inches (300 mm) of Teflon® tape in clockwise direction to pipe threads
of each fitting.
2. If mounting bracket (not supplied) is to be used, attach to cap before assembling the fittings.
NOTE: Allow 1-1/2 inches (33 mm) clearance below housing to enable filter cartridge
changes.
3. Assemble all fittings. Start adapters into cap by hand.
Use a wrench to tighten firmly. DO NOT OVER-TIGHTEN.
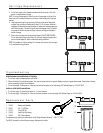
4. Measure length (shown as X on diagram) across assembled fittings and subtract 1 inch
(25 mm) if you are installing on 3/4 inch (19 mm) pipe, or 1-1/2 inches (38 mm) if
you are installing on 1 inch (25 mm) pipe. Mark section of pipe to be removed.
5. Using a pipe cutter or hacksaw, remove marked section of pipe and thread remaining
ends. Wrap threads with Teflon tape.
6. Align filter assembly with ends of pipe, making certain cap opening marked “IN” is facing
the incoming water supply. It will be necessary to spread ends of pipe apart to install filter
assembly. Using two adjustable wrenches, hold incoming adapter securely with one
wrench and tighten nut with second wrench. Repeat procedure for outgoing adapter.
CAUTION: If water pipes are used to ground electrical systems, appliances, or phones, be
certain to install a jumper wire. Contact your local electrician for more information.
(Diagram 6)
Slowly turn on water supply to filter and depress red pressure-relief button on cap to
release trapped air. Check for leaks. Open nearest faucet and flush filter for 10 minutes,
wait one hour, then flush again for 10 minutes.
2
1
6
3
4
5
x
x
2