


Troubleshooting
Leaks between cap and bottom of housing:
1. Turn off water supply and depress pressure-relief button.
2. Clean and lubricate O-ring with silicone grease. Also, clean the groove where the o-ring seats. Replace o-ring back in groove above threads. Screw bottom of housing
back on cap securely by hand. Do not overtighten.
3. Turn on water supply. If leaks persist, or if there are other leaks on the system, turn off water supply. Call Technical Support at 1-800-645-5426.
Leaks on inlet/outlet connections:
1. Turn off water supply. For brass fittings, tighten nut 1/2-turn with wrench.
2. Turn on water supply. If leaks persist, or if there are other leaks on system, turn off water supply. Call Technical Support at 1-800-645-5426.
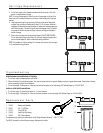
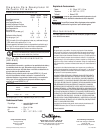
Replacement Parts
1 151039 Pressure-relief Assembly
2 154531 Cap, 1” HFPP Blue
3 151122 O ring (OR-100)
4 153029 Heavy Duty Blue Housing
5 150296 SW-3 Housing Wrench
For replacement parts, contact your nearest retailer or call Culligan Consumer Services @ 1-888-777-7962.
The HD-950 is covered by a limited five year warranty. See warranty for details.
3
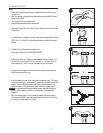
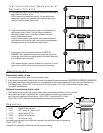
Cartridge Replacement
A. Turn off water supply to filter. Depress red pressure-relief button on top of filter. Use
wrench to unscrew bottom of housing.
NOTE: If turning off water supply to filter will also turn off water supply to the rest of the
home, be sure to fill a bucket of water first to allow you to clean housing after it has been
removed.
B. Locate and remove large O-ring, wipe clean of lubricant and set aside. Discard used
cartridge. Rinse out bottom of housing and fill about 1/3 full with water. Add about 2
tablespoons of bleach and scrub cap and bottom of housing with nonabrasive sponge or
cloth. Rinse thoroughly. Lubricate O-ring with clean silicone grease. Insert O-ring back
into groove and smooth into place with finger. Insert new cartridge over standpipe in
bottom of housing.
C. Screw bottom of housing onto the cap and hand-tighten. DO NOT OVER-TIGHTEN.
Turn on water supply slowly to allow filter to fill with water. Depress red pressure-relief
button to release trapped air. Check for leaks before leaving installation.
NOTE: After installation, flush the cartridge for 10 minutes, wait one hour, then flush again
for 10 minutes before using the water.
A
C
B
1
2
3
4
5