


key
ቢ lid handle
ባ viewing window
ቤ automatic dispenser
ብ heating element
ቦ bread pan handle
ቧ kneader
ቨ drive shaft
ቩ drive coupling
ቪ on/off switch
ቫ measuring cup
ቭ dual measuring spoon 1tsp & 1tbsp
ቮ control panel
ቯ display window
ተ program status indicator
ቱ crust colour indicators (light, medium, dark)
ቲ delay timer buttons
ታ menu button
ቴ loaf size button
ት program button
ቶ confirm button
viewing light
favourite button
start/stop button
rapid bake button
cancel button
crust colour button
loaf size indicators
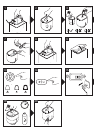
how to measure ingredients (refer to
illustrations 3 to 7)
It is extremely important to use the exact measure of
ingredients for best results.
●
Always measure liquid ingredients in the see-through
measuring cup with graduated markings provided.
Liquid should just reach marking on cup at eye level,
not above or below (see 3).
●
Always use liquids at room temperature, 20ºC/68ºF,
unless making bread using the rapid 1 hour cycle.
Follow the instructions given in the recipe section.
●
Always use the measuring spoon provided to measure
smaller quantities of dry and liquid ingredients. Use the
slider to select between the following measure -
1
⁄
2 tsp,
1 tsp,
1
⁄2 tbsp or 1 tbsp. Fill to the top and level off the
spoon (see 6).
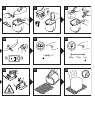
ቪ on/off switch
Your Kenwood breadmaker is fitted with an ON/OFF
switch and will not operate until the “on” switch is
pressed.
●
Plug in and press the ON/OFF switch ቪ situated at the
back of the breadmaker - the unit will beep and 1 (3:15)
will appear in the display window.
●
Always switch off and unplug your breadmaker after
use.
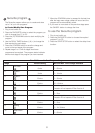
ተ program status indicator
The program status indicator is situated in the display
window and the indicator arrow will point to the stage
of the cycle the breadmaker has reached as follows: -
Pre-heat – The pre-heat feature only operates at the
start of the wholewheat (30 minutes), wholewheat rapid
(5 minutes) and gluten free (8 minutes) settings to warm
the ingredients before the first kneading stage begins.
There is no kneader action during this
period.
Knead – The dough is either in the first or 2nd
kneading stage or being knocked back between the
rising cycles. During the last 20 minutes of the 2nd
Kneading cycle on setting (1), (2), (3). (4). (5). (6). (9),
(10), (11) and (13) the automatic dispenser will operate
and an alert will sound to tell you to add any additional
ingredients manually.
Rise – the dough is in either the 1st, 2nd or 3rd
rising cycle.
Bake – The loaf is in the final baking cycle.
Keep Warm – The bread maker automatically goes
into the Keep warm mode at the end of the baking
cycle. It will stay on the keep warm mode for up to
1hour or until the machine is turned off, which ever is
soonest. Please note: the heating element will
switch on and off and will glow intermittently
during the keep warm cycle.
3