


32
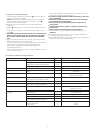
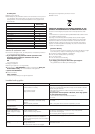
choosing a speed for all functions
Tool/Attachment Function Speed Maximum Capacities
Knife Blade One Stage Cake Mix 1 – 8 2Kg/4lb 8oz total weight
Rubbing fat into flour 3 – 8 500g/1lb 2oz flour weight
Adding water to combine pastry ingredients 3 – 8
Chopping/pureeing/pâtés 8 1Kg/2lb 4oz chopping lean meat total weight
Knife Blade with maxi-blend canopy Soups – start at a low speed and move up to Max 1 – 8 2 litres/3
1
⁄2 pts
Whisk Egg Whites
auto
2 – 8
Cream 250-750 mls
Dough tool Yeasted mixes 6 – 8 1.3Kg/2lb 12oz total weight
650g/1lb 8oz flour weight
Discs – slicing/shredding/chipping Firm food items such as carrots, hard cheese. 5 – 8 –
Softer items such as cucumbers, tomatoes 1 – 3 –
Mini Bowl & knife All processing 8 300g/12oz lean meat total weight
Citrus Press Smaller fruits i.e. limes and lemons 1–
Larger fruits i.e. oranges and grapefruits 2
Centrifugal juicer Juicing firm fruit and vegetables ie apples and carrots auto 1Kg/2lb 4oz apples
800g/1lb 12oz carrots
Juicing soft fruits ie grapes and tomatoes 500g/1lb 2oz
Liquidiser Soups and drinks 8 1.5 litres/2pts 12fl.oz
Mayonnaise 8 3 eggs + 450 ml oil
Frothing milk 8 1 litre/1
1
⁄2pt
Ice crushing - operate the pulse in short bursts pulse 6 cubes
until crushed to the desired consistency
Multi-mill Processing a range of spices 8 100g/4oz
Grinding coffee beans 8 75g/3oz
Chopping nuts 8 140g/5oz
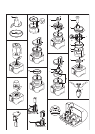
to use your food processor
1
Fit the detachable drive shaft onto the power unit ᕡ – push down lightly to
e
nsure the drive shaft is fully engaged.
2 Then fit the bowl with the handle to the right hand side of the power unit.
P
lace the handle towards the back and turn clockwise until it locks ᕢ.
3
Fit an attachment over the drive shaft.
●
Always fit the bowl and attachment onto the processor before adding
i
ngredients.
4
Fit the lid ᕣ - ensuring the top of the drive shaft locates into the centre of the
lid.
5
Fit the pushers to the feed tube – turn the small pusher clockwise to lock in
p
osition ᕤ.
●
The processor will not operate if the bowl, lid or wide feed tube
p
usher are not fitted correctly into the interlocks. Check that
t
he feed tube and bowl handle are situated to the right hand
side.
6
Plug in. The Power On light will come on and flash until the bowl and lid are
f
itted correctly. Select one of the following options: -
Auto Button – the light will come on when the Auto Button is pressed and the
o
ptimum speed for the attachment will be automatically selected.
S
peed Control – manually select the required speed (Refer to the
recommended speed chart).
P
ulse – use the pulse (P) for short bursts. The pulse will operate for as long as
t
he control is held in position.
7
At the end of processing turn the speed control to the 0 position or if using
t
he Auto press the button and the light will go out.
●
The Power On light will flash if either the lid, bowl or wide feed
t
ube are not fitted.
●
T
he Power On and Auto lights will flash if the Auto is selected
but the interlocks are not engaged.
●
D
o not use the lid to operate the processor, always use the
o
n/off control.
●
The Auto button will not operate if a speed is selected on the
s
peed control.
●
A
lways switch off and unplug before removing the lid.
8 Reverse the above procedure to remove the lid, attachments and bowl.
important
●
Y
our processor bowl is not suitable for crushing or grinding coffee beans, or
c
onverting granulated sugar to caster sugar.
●
When adding almond essence or flavouring to mixtures avoid contact with the
p
lastic as this may result in permanent marking.