


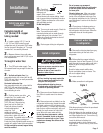


Installation
steps
IMPORTANT
• All four leveling legs must contact the
floor to support and stabilize the full
weight of the refrigerator.
• Keep cardboard shipping piece or
plywood under refrigerator until it is
installed in operating position.
Page 5
Install new water line
if required.
4. Check that
both ends of copper
tubing are cut
square. Slide compression
nut and sleeve onto copper tubing. Insert
end of copper tubing completely into valve
outlet. Tighten compression nut to outlet
with adjustable wrench.
Do Not overtighten.
5. Turn on main water supply. Check for
leaks. Turn saddle valve handle
counterclockwise and run water through
copper tubing and into a bucket. Turn
saddle valve handle clockwise to shut off
water to copper tubing.
6. Route copper tubing to refrigerator
area.
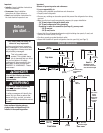
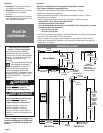
Calculate length of
1/4" (6 mm) O.D. copper
tubing needed:
1. Locate a vertical 1/2" (1.3 cm) to
1-1/4" (3.2 cm) COLD water line near
refrigerator area. A horizontal COLD water
line can be used if directions in “To rough
in water line” are carefully followed.
2. Measure distance from cold water
line to refrigerator area. Add 24" (61 cm) to
this measurement.
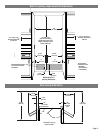
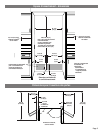
To rough in water line:
1. Turn OFF main water supply. Turn
ON nearest faucet long enough to clear line
of water.
2. Vertical cold water line: Use
grounded electric drill or hand drill to drill
3/16" (4.8 mm) hole in an easily accessible
location in water line.
Horizontal cold water line:
Use grounded electric drill or hand drill to
drill 3/16" (4.8 mm) hole in the top
of the water line. This will keep sediment
from collecting in valve.
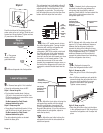
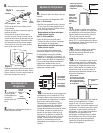
3. Position washer over hole
in water line. Turn saddle valve
handle clockwise to expose
piercing lance a maximum of
3/16" (4.8 mm). Align piercing
lance over hole in water line.
Place both halves of saddle
valve bracket against
water line. Turn
saddle valve handle
clockwise until piercing lance
enters hole in water line and is
firmly seated. The saddle valve is not in the
closed position. Tighten packing nut.
Evenly and firmly tighten bracket screws so
washer will make a water-tight connection.
Do Not overtighten screws; copper tubing
could be crushed.
compression nut
ferrule
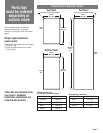
Install refrigerator.
1. Remove and save literature package.
Use 3/8-inch socket wrench to remove
skids.
2. Remove tape and any labels from the
refrigerator before using (except the model
and serial number on the refrigerator side,
top right corner.) To remove any remaining
tape or glue, rub the area briskly with your
thumb or a small amount of liquid dish
soap. Wipe with warm water and dry.
Do not use sharp instruments, rubbing
alcohol, flammable liquids or abrasive
cleaners to remove tape or glue. These
products can damage the surface of the
refrigerator.
Connect water line
to refrigerator.
4. Remove the shipping tape from gray,
coiled water tubing on the rear of the
refrigerator.
5. Before attaching copper tubing to
refrigerator, flush at least 2 quarts (1.9 L) of
water through the copper tubing and into a
bucket to get rid of any particles in the
water line.
Check for leaks around saddle valve.
Do not overtighten clamp or sleeve. This
will crush copper tubing.
Turn water valve off.
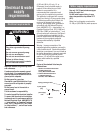
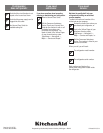
6. Make connection to refrigerator.
Style 1
bulb
nut
(provided)
ferrule
(purchased)
coupling
(purchased)
nut
(purchased)
to refrigerator
Slide the purchased nut then the purchased
ferrule onto the tubing.
Push the tubing into the coupling as far as
it will go. Slide the nut and ferrule forward
and finger tighten the nut. Turn nut two (2)
more turns with wrench.
Insert the bulb end of tubing into
purchased coupling, slide nut down and
finger tighten. Turn nut two (2) more turns
with wrench.
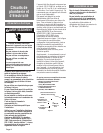
Excessive Weight Hazard
Use two or more people to move
and install refrigerator.
Failure to do so can result in
back or other injury.
WARNING
Do not remove any permanent
instruction labels inside the refrigerator
or the tech sheets that are fastened to
the base grille.
Cleaning before use: After you remove
all of the packaging materials, clean the
inside of the refrigerator before use. See
the cleaning instructions in the “Caring for
your Refrigerator” section of the Use and
Care Guide.
3. Place pieces of shipping carton or
plywood on the floor when rolling dolly
and refrigerator into the house. Move the
refrigerator close to the refrigerator
opening.