


13. If desired, the 4 rollers may now
be raised to close the gap between the
refrigerator top hinge and the cabinet
opening. Check that all 4 rollers contact the
floor and the cabinet doors above the
refrigerator open fully.
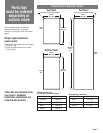
NOTE: Cabinets with full-overlay doors will
require 1/4" (6 mm) additional clearance
between the top hinge and cabinet to
prevent the doors from hitting the hinge
when opening. (If you have a trim/panel kit
on the refrigerator doors, 3/4" (19 mm)
additional clearance will be required to
prevent the cabinet doors from interfering
with the refrigerator door trims.)
14. Replace the base grille.
• Open the refrigerator doors to 90°.
Style 1: Screw-on grille
• Place the grille in front of the base grille
area.
• Use a Phillips screwdriver and guide the
screws through the grille holes and into
the screw clips located in the corner
plates on each side of the opening.
Tighten screws securely.
Style 2: Snap-on grille
• Place the grille lower clips into the holes
in the refrigerator panel. Roll the grille up
toward the refrigerator until it snaps into
place.
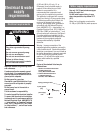
Plug in
refrigerator.
Level refrigerator.
Page 6
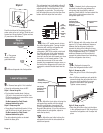
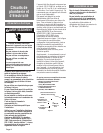
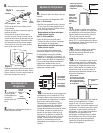
Style 2
bulb
nut
(provided)
rear
adjusting
bolt
(yellow)
front
adjusting
bolt
(silver)
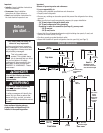
Push the bulb end of the tubing into the
water valve as far as it will go. Slide the nut
forward and finger tighten. Tighten nut two
(2) more turns with wrench.
9. Remove base grille if it is installed.
• Open the refrigerator doors to 90°.
Style 1: Screw-on grille
• Find pockets located about 4 inches
(10 cm) in from each end of grille. Use
Phillips screwdriver to remove the screw
found in each pocket.
Do Not remove the Tech Sheets
fastened behind the grille.
Style 2: Snap-on grille
• Grasp the grille with both hands. Lift up
and tilt the top of the grill toward you.
Do Not remove the Tech Sheets
fastened behind the grille.
The roller adjusting bolts are located
behind the base grille.
10. Use a 1/2" socket wrench to turn
the roller adjusting bolts. Turning the bolt
clockwise will raise the refrigerator and
counterclockwise will lower the
refrigerator. (NOTE: Be careful not to back
the roller bolts out of the roller brackets
when lowering the refrigerator. The bolt
head will start to back out toward you when
the roller is in its lowest position. If the
screw does come out of the rear roller
bracket, the compartment access cover on
the back of the refrigerator will have to be
removed to reinstall the bolt back into the
nut.)
grounded
outlet
power
supply
cord
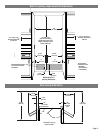
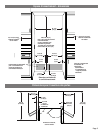
1/8" (3 mm)
clearance for
leveling refrigerator
1/4" (6 mm)
clearance set for
full-overlay
cabinet doors
cabinet
3/4" (19 mm)
clearance set for
full-overlay cabinet
doors and
refrigerator trim kit
cabinet
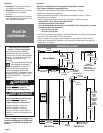
11. Adjust the front rollers to bring the
refrigerator top parallel with the cabinet
above the refrigerator; leave about 1/8"
(3 mm) gap between the refrigerator top
hinge and the cabinet. (If you do not have a
cabinet above the refrigerator, adjust to
make the top level.)
12. Adjust the rear bolts to bring the
refrigerator level with the side cabinets or
cabinet end panels.
7. Plug power
supply cord into
grounded outlet.
8. Move refrigerator into final position.
This refrigerator has 4 adjustable rollers (2
front and 2 rear). There are 2 sets of roller
adjusting bolts found at the base of the
refrigerator on each side. The yellow top
bolt will adjust the rear roller and the silver
bottom bolt will adjust the front roller.