


Start the in&Nation
Installation
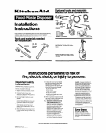
dimensions _
Food Waste Disposer
Dimenslons In Mllllmeters.
B’ - Distance from bottom of sink to center
Ike of disposer outlet Add 1Q 7 mm tien
sramless steel srnk is used.
C* - Length of waste line pope horn center
IIW of disposer outlet to end of
waSte
line
LE-I
me.
IMPORTANT: Plumb waste line to prevent
standrng water in the drsposer motor
housrng.
Drawing
shows Just one model type.
Check that
all parts were
included.
InaP rins
2
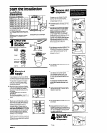
Electrical
supply
Before attemptrng to rnstall electrrcal supply
to your drsposer, you must be very famrlrar
wrth electrical power and proper procedures
If you are not, contact a qualrfred electwan
Thus applrance IS equrpped wrth copper
wires. Use 3-conductor copper cable rn
accordance with the local code to make
ccnnectrons to the unit.
A Remove the fuse or turn the circurt breaker
to U-e “0W position for the circuit you plan
to use for your drsposer Use a separate
PO-ampere, llS.volt, 63 Hz onty crrcurt for
the drsposer.
If you are nplaclng a” old disposer,
go to step 3.
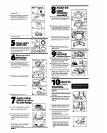
For a first tlmc Installation, connect 15. or
PO-amp, 115~Volt cable from~unctior box to
swtch.
6. For continuous feed models. Install a 15- of
PO-amp wall swtch above the countertop
and junction box inside c&net as show
Whp swatch and elecmcal wiring can be
obtarned locally) Position titch in a
corwenrent locatron Connect swtch to
junction box. All wlrlng must comply wkh
locsl codes and ordlnmces. NO. 14.gauge
wee is the smellest srze wire allowable for
use with a 15-amp crrcurt. No. lQ-gauge
wrre IS the smallest allowable for use wrth
a W-amp crrcurt Go to Step 4.
The drsposer can be rnstalled usrng a power
supply cotd wrth a 3.prong groundrng plug
Th6 type of power supply cord 1s a&able
from local sources
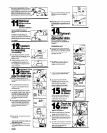
3
Remove old
disposer.
Compare your new disposer mountrng
assembly wrth the exrstrng mountrng.
If the mounting assembkes are the same,
complete Steps 3A, 8, D, E.
A. Using a pope wrench, disconnect the drain
lrne &we rt attaches to the drsposer waste
line prpe
B. If old dlspour mwntlng Is the sdme a5
your new one, rnsen end of jam-breaker
wench of screwdwer into right srde of a
disposer mounting ring lug at
top Of
drsposer Hold drsposer wth other hand
Turn Jam-breaker wench of
SCrWdliW
counterclockw4se unth lug lanes up with one
of the sink-mwntlrg assembly scrw6
CAUTION: Hold dlsposcr 4th one hand
while turning to prevent It from frlllng
when the mounting rmg Is dlsconnccted.
Remove drsposer Go to Step 3-D.
C. II old disposer mounting Is different from
your new one, remove the nuts on the
mountrng rrng usrng plrers or an adjustable
wench. Remove old drsposer. You may
need to remove a clamp or burst the
drswser to remove It
D.Tum disposer upside down and remove the
electrical plate.
E. use a xwwdrrver to remove the grounding
we. Remove wire nuts horn power
mres Separate dwoser power wires
km the cable wres Loosen screv.6)
on warn relief and remove cable from the
disposer.
lfold disposer mounting is the same
es your new disposer mounting, go to
step 5.
E Loosen screws and remove the mountrng
rrng and back-up rings.. A hammer may be
needed to looSen rings..
G. Push old sink sleeve up through the srnk hole
and remwe
1
H.Clean sealant horn smk hole nm using a
xre+.driver or putty knfe to scrape away all
traces of putty of caulklrg from the sink hole
rim. Hole nm must be as clean as possible
for a gad, watertrght seal.
4
To install our
sink’s firs
Y
disposer :
&Use wrench to looser! nut at top of
“P”.Wap.