


Making electrical
and vent
connections
If you are installing external
blower on a flat roof:
Locate the 11" (27.9 cm) dia. hole
between rafters.
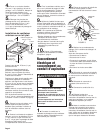
Build a sloping base that will mount the
exterior blower at a minimum pitch of
2-1/2" (6.4 cm). Weatherproof the base
as required.
Locate the base so that the exterior
blower's vent aligns with the 11"
(27.9 cm) dia. hole and the blower sits
evenly on the base with no gaps.
NOTE: Make sure that the discharge
end of the exterior blower faces away
from the direction of prevailing winds.
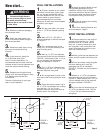
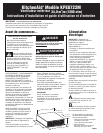
Use dimensions from either FIGURE 1
or 2 (Page 3) to locate the 1-1/4"
(3.0 cm) dia. wiring hole.
33-1/4"
(84.5 cm)
2 x 4 framing
recommended
2"
(5.1 cm)
7"
(17.8 cm)
26-3/4"
(67.9 cm)
11" (27.9 cm)
dia. hole
discharge side
of blower
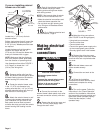
6.Remove roofing nails from the
upper two-thirds of the shingles to allow
the back flashing sheet on the exterior
blower housing to fit under them.
7.Center the exterior blower collar
in the 11" (27.9 cm) diameter hole,
making sure that the 1-1/4" (or 3.0 cm)
diameter electrical wiring hole lines up
with the hole in the wiring box.
8.Attach the exterior blower to roof
or frame using screws appropriate for
your installation. All four holes in the
back panel must be filled to prevent
moisture that may get inside the remote
blower housing from leaking into the
home.
Electrical Shock Hazard
Disconnect power before
servicing.
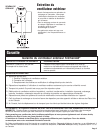
Connect the ground wire to green
ground screw in wiring box.
Failure to do so can result in
death or electrical shock.
WARNING
1.Connect the vent work to the
exterior blower’s black plastic vent collar
and seal connection securely with duct
tape.
2.Remove the wiring box cover and
pull the 120-volt power supply cable
through the strain relief.
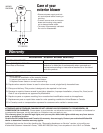
green
ground
wire
green
ground
screw
motor
wiring
white
wires
black
wires
twist-on
connectors
9.Seal all the shingles around the
exterior blower housing or frame,
flashing and mounting screw heads
with roofing cement.
NOTE: If the top and sides of exterior
blower are to be covered with trim:
• Make the electrical connections and
check the blower operation first.
• Do not block vent grill opening with
trim. Doing so will decrease blower
performance.
10.Go to “Making electrical and
vent connections”, Page 4.
Page 4
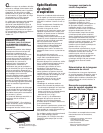
FIGURE 3
3.Make the wiring connections.
(See FIGURE 3 and wiring diagram.)
• Using twist-on connectors:
• Connect white wires.
• Connect black wires.
• Connect the green power supply wire
to the unused green ground screw.
• Securely tighten strain relief screws.
4.Replace the wiring box cover
and securely tighten the screws. Make
sure that wires are not pinched under
the cover.
5.Reinstall blower cover and
tighten screws securely.
6.Connect the vent work to the
hood.
7.Follow the Installation
Instructions that came with the hood
installed and complete the wiring
connections.
8.Turn on the power. Follow the
instructions in the “Check Operation”
section of the Installation Instructions
that came with the hood installed and
make sure blower operates properly.
Check that the damper, if used,
operates freely.