


8
Condenser
A dirty or clogged condenser:
■ Obstructs proper airflow.
■ Reduces ice making capacity.
■ Causes higher than recommended operating temperatures
which may lead to component failure.
1. Unplug ice maker or disconnect power.
2. Using a Phillips screwdriver, remove the two screws in the
lower access panel and the two screws from the base grille
area of the front panel support.
3. Pull out on the base grille then pull down on the panel to
remove.
4. Remove dirt and lint from the condenser fins and the unit
compartment with a brush attachment on a vacuum cleaner.
5. Replace the lower access panel using the two screws.
6. Plug in ice maker or reconnect power.
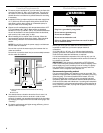
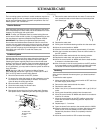
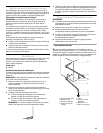
Interior Components
1. Unplug ice maker or disconnect power.
2. Open the storage bin door and remove any ice that is in the
bin.
3. Remove the slope by bending it in the center and releasing it
from the shafts.
4. Remove the water tank, and drain the water.
5. Remove the separators by lifting each separator up and
pushing back.
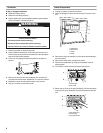
6. Lift off the ice chute from the rear and front frames.
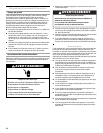
7. Below the ice chute is the spray assembly. Pull the discharge
tube from the spray assembly and pull the assembly toward
you.
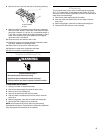
WARNING
Electrical Shock Hazard
Disconnect power before cleaning.
Replace all parts and panels before operating.
Failure to do so can result in death or electrical shock.
A. Separators
B. Water Tank
C. Slope
D.Shaft
A. Frame Pipe
B.Ice Chute
A. Discharge tube
B.Frame pipe
C. Spray assembly
A
B
C
D
A
B
A
C
B