


GENERAL INSTRUCTIONS.
1. In old houses, it is generally good practice
to clean out the existing drain line from,
sink
to sewer before installing the
DISPOSER.
2. The disposer can be installed in steel,
monel, stainless steel or cast iron sinks.
with a sink opening of 3-l/2” to
4”
without sink alteration.
3. Standard l-I/Z” O.D. or 2” O.D. drain
pipe is satisfactory for drain lines. Long
horizontal drain lines should be elimi-
nated. Drum traps and grease traps should
not be used.
4. Where possible, the reversing toggle switch
should be positioned where it is readily
accessible.
!
PLUMBING INSTALLATION INSTRUCTIONS:
1. Remove existing sink drain connections
and
clean drain opening.
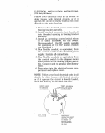
2. Remove disposer cover.
3. Insert screwdriver under lever (I) and pry
outward. Disengage hooks (J) and (F)
from support plate (D).
4. Disassemble items A, B, C, and D of
mounting assembly by prying snap ring
(E) from groove in sink flange (A).
5. Apply a bead of permanent pliable sealing
compound underneath sink flange (A).
Insert the sink flange (A) into the drain
opening.
NOTE: THE SINK FLANGE MUST BE
LEVEL BEFORE MOUNTING DISPOSER.
6. Assemble paperboard flange seal (B), pres-
sure washer (C), and support plate (D)
onto the sink flange and lock in place
with snap ring (E). Tighten the three jack
screws (K) EVENLY against pressure
washer (C) to secure the mounting assem-
bly to the sink.
7. Be sure the isolating splash guard (G) is In
place. Lirt disposer and engage hook (F)
onto support plate (D), then engage hc
(J) onto support plate (D) Turn dispoh.
to align with drain trap. Snap lever (I)
downward to lock.
8. Connect the drain trap to the spout (H).
Ii necessary, pry lever
(I) outward and
tllrn dispqser for better all_nment
9 Check to assure that the grinding chamber
is clean of any foreign objecls and the
flywheel is free to rotate. Place the cover
in position.
10. Installation must be in accordance with
local plumbing codes.
[FFisiiE]
DISHWASHER CONNECTION:
Connecting the discharge of a. dlshwasher
to a disposer will assure all waste particles
discharged by the dishwasher are properly
sized and flushed through to the main drain
system. A dishwasher drain inlet that will
accept a 3/4” I.D. hose is provided In the side
the upper housing grlnding chamber for
-,nnection of the dishwasher discharge
I. Use a small cold chisel to cut out the back
wall “knockout”
of the dishwasher Inlet
boss of the disposer.
2. Remove any
pieces
of the “knockout”
and chips from the grindInT chamber.
3. Connect the dishwasher drain host to tllc
disposer inlet with a hose clamp
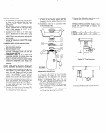
nPlCAL INSTALLATIONS: Height of drain
should not exceed height of disposer dis-
charge opening.
MODEL
A 6 C 0
KWC-ZOO 6
3/8- a 114” 14” 5 3/16-
Typical “P” Trap Connection
Connection WithStraight-away Drain Spout