


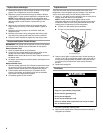

9
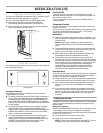
Freezer Controls
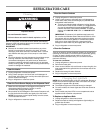
Make sure FREEZER is selected. The up and down arrows on the
display screen allow you to adjust the freezer compartment
temperature. The set point range for the freezer is -5°F to 5°F
(-21°C to -15°C).
■ Press the down arrow to lower the set point.
■ Press the up arrow to raise the set point.
NOTE: To view Celsius temperatures, press UNITS. To return
the display setting to Fahrenheit, press UNITS again.
Press BACK to exit adjust mode.
Features
Photos
The refrigerator comes from the factory with the display screen
preloaded with photos provided by the manufacturer. You may
choose to keep or delete these photos.
NOTE: The display screen has a capacity of 100 photos.
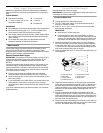
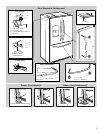
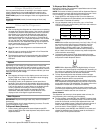
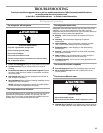
USB Port
A USB port is located under the display screen in the dispenser
area as shown.
IMPORTANT:
■ A USB memory device is not provided with the refrigerator.
Some USB memory devices are not readable. The USB port
supports only USB 1.1 and 2.0 standard memory devices.
■ Upload photos stored in the main directory of the USB
memory device, not from any designated folder.
■ The USB reads only JPEG photos. To decrease upload time,
consider reducing the image resolution.
NOTE: The recommended image resolution is 480 x
272 pixels.
■ Do not download any photos directly from digital cameras or
other external devices.
■ The USB port does not work as a charging device.
■ The ice and water dispensers will not function when the USB
memory device is inserted into the USB port.
Upload Photos to the Display
1. Remove the cover from the USB port.
2. With the Home Screen shown on the Display, press PHOTOS
and insert the USB memory device. The control panel will
display all JPEG photos found on the USB memory device.
NOTE: Up to 100 photos can be uploaded to the display
screen.
3. Touch the photos you wish to select. The selected photos will
be highlighted.
NOTE: A selected image will be unselected if it is touched
again.
4. Press UPLOAD SELECTED to upload just the selected
photos, or press UPLOAD THIS PAGE to upload the six
photos visible on the screen. Repeat this process to upload
up to 100 photos.
5. Remove the USB memory device and replace the cover on the
USB port.
IMPORTANT:
Uploading will be interrupted if any of the following occur:
■ If any of the FILL buttons, dispenser paddles or CANCEL are
pressed.
■ If a door ajar alarm, or power outage occurs during uploading.
■ If the USB memory device is removed.
NOTE: If the USB memory device is removed while uploading
photos, the display will show only the photos that have
completely transferred. If no photos have completely
transferred, the display returns to the Home screen.
Delete Photos from the Display
Photos can be removed from the display once uploaded.
1. Select the image(s) you wish to delete by touching it on the
display. The selected photos will be highlighted.
2. Press DELETE SELECTED to delete just the selected photos,
or press DELETE ALL to delete all uploaded photos.
NOTE: A FACTORY RESET will also delete all uploaded
photos from the display screen.
IMPORTANT:
Deleting will be interrupted if any of the following occur:
■ If any of the FILL buttons, dispenser paddles or CANCEL are
pressed.
■ If a door ajar alarm, or power outage occurs during deleting.
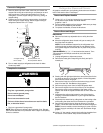
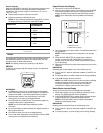
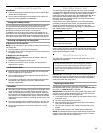
CONDITION: TEMPERATURE
ADJUSTMENT:
REFRIGERATOR too cold REFRIGERATOR Setting
1° higher
REFRIGERATOR too warm REFRIGERATOR Setting
1° lower
FREEZER too cold FREEZER Setting
1° higher
FREEZER too warm/too little ice FREEZER Setting
1° lower
A. USB port cover
B.USB memory device
A
B