


12
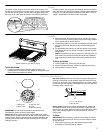
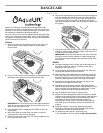
Roll-Out Rack
The roll-out rack allows easy access to position and remove food in
the oven. The roll-out rack will fit in all positions except the top rack
position 7.
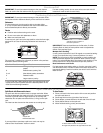
Open Position
NOTE: To fully extend the roll-out rack, pull the sliding rack
forward, and continue pulling until the rack frame slides forward.
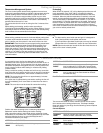
Closed and Engaged Position
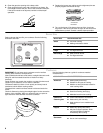
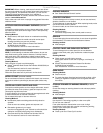
To Insert Roll-Out Rack
1. Angle the front of the rack assembly up and insert the rack
frame into the “V” cutout in the rack guides of the oven cavity.
2. Keep rack assembly lifted up at an angle and push in to bypass
the lower “V” cutout.
3. Lower the front of the rack assembly and gently slide rack
assembly into oven, bypassing the “V” cutouts. Push the rack
assembly to the back of the oven until it stops.
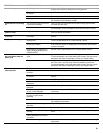
To Remove Roll-out Rack
1. Push the sliding rack in completely so that it is in the closed
and engaged position.
2. Using 2 hands, gently pull the sliding rack and the rack frame at
the same time to the “V” cutout. Angle the rack so that the front
is higher than the back, and gently pull rack past “V” cutout
and then out of the oven.
To avoid damage to the sliding rack, do not place more than 25 lbs
(11.4 kg) on the rack.
Do not clean the roll-out rack in a dishwasher. It may remove the
rack’s lubricant and affect its ability to slide.
See the “General Cleaning” section for more information.
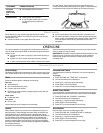
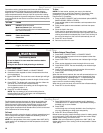
Oven Vent
The oven vent releases hot air and moisture from the oven, and
should not be blocked or covered. Blocking or covering the oven
vent will cause poor air circulation, affecting cooking and cleaning
results. Do not set plastics, paper or other items that could melt or
burn near the oven vent.
A. Rack frame
B. Sliding rack
A. Sliding rack
B. Rack frame
A. Rack frame
B. Sliding rack
A
B
A
B
A
B
A. “V” cutout
B.Rack guides
A. “V” cutout
B. Rack guides
A
B
A
B
A. Oven vent
A