


8
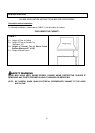
Hood Preparation Before Installation
CAUTION
: If moving the cooking range is
necessary to install the hood, turn off the power in
an electric range at the main electrical box. SHUT
OFF THE GAS BEFORE MOVING A GAS RANGE.
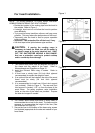
19. Determine and mark the centerlines on the base of the
wood frame where the insert will be installed.
20. Determine and make all necessary cuts in the wall or
ceiling for the ductwork. Note: Install the ductwork
before installing the insert.
21. Determine the proper location for the Power Supply
Cable. Make a wiring access hole using a drill bit.
Install the wire cable and seal the gap around hole.
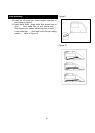
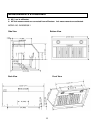
22. Cut out the opening where the insert will be installed.
(Figure 5)
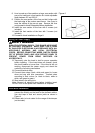
Hood Installation
NOTE: USE HAND TOOLS ONLY. DO NOT OVER
TIGHTEN SCREWS. IT MIGHT CAUSED DAMAGED TO
THE HOOD.
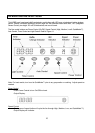
23. Remove 4 screws located at the bottom of the insert. (Fig.
6). Slowly remove the light support panel and unplug all
the connections as shown in Fig. 7.
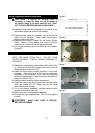
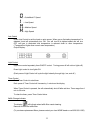
24. Install the hood casing support (provided in the screw
package). Adjust the level of the locking mechanism
according to the thickness of the base (3/4 thickness
plywood recommended). Tighten the screws (included) to
secure as shown in Fig. 8.
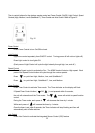
25. Install the insert inside the custom wood frame.
26. Install the insert using the rear and front mounting holes
which are located at 1-1/2” (38mm) up from the insert
base (Screws not included).
27. For a more secure installation, use the mounting holes
located on the side of the insert
28. Make sure insert is secure before releasing.
29. Re-install the light support panel. (Do not over tighten
screws.)
CAUTION
: MAKE SURE HOOD IS SECURE
BEFORE RELEASING.
Figure 5
Figure 6
Figure 7
Figure 8