


4
PLACEMENT
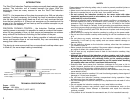
• Place the cooktop on a stable and level non-metallic surface making
sure that it is not flammable surface (e.g. table cloth, carpet, etc.).
• Do not block the ventilation slots of the induction cooktop. Keep a
minimum distance of 5” from walls and other objects, appliances, etc.
• Do not place the induction cooktop next to devices or objects that
react sensitively to magnetic fields (e.g. radios, TVs, computers,
etc.).
• Do not place the induction cooktop next to open fires, heaters or other
sources of heat.
• Make sure that the power cord is not damaged or compressed beneath
the induction cooktop and does not come into contact with sharp
edges or hot surfaces.
• Prior to connecting the induction cooktop, check whether the voltage
indicated in this manual corresponds to the voltage supply in your
home. A wrong connection may lead to damage to the induction
cooktop and possible injury to persons.
• The cooktop’s surface is made of temperature-resistant glass. In the
event that damage to the unit is observed, even if it is only a small crack
on the glass surface, disconnect the induction cooktop from the power
supply immediately and contact our customer service department by
calling 1 800 265- 8 456
COMPATIBLE POTS AND PANS
Steel or cast iron, enameled iron, stainless steel, flat-bottom pans/pots
with diameter of 12 to 26 cm (4.7” to 10.25”).
NON-COMPATIBLE POTS AND PANS
Heat-resistant glass, ceramic container, copper, aluminum pans/pots.
Rounded-bottom pan/pots with the base measuring less than 12cm
(4.7”).
NOTE: Many high quality cookware are made of non-magnetic stainless
steel and cannot be used with the induction cooktop. If in doubt, please
try a magnet to check your cookware.
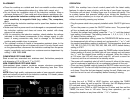
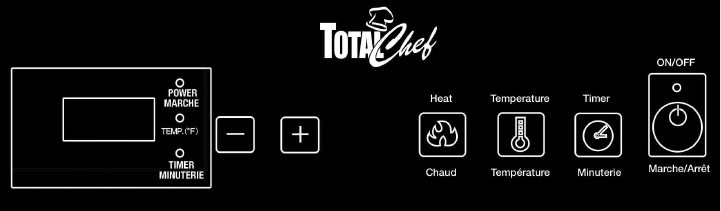
OPERATION
NOTE: this cooktop has a touch control panel with the latest safety
features. In order to press a button, with the tip of your finger, tap once.
The button will not react, if sliding finger over it or press too gently. This
is a safety feature that prevents children from turning the cooktop on
easily, and also enables you to wipe off spills from the cooking surface
without accidentally pressing any buttons.
- Plug the power cable into a properly installed outlet. ON/OFF light turns
on.
- To turn the power on, press the ON/OFF button once. The power light
will turn a steady red and heating will begin.
- To select the proper heat setting, press the “-” or “+” until the desired
heat setting is achieved. The heating levels are 1, 2, 3, 4, 5, 6, 7, 8, 9,
10, default factory setting is 5.
- To select temperature setting, press the TEMPERATURE button once,
the temperature light will turn a steady red, and press the “-” or “+” until
the correct temperature setting is achieved. The temperature levels are
150, 180, 210, 240, 270, 300, 330, 360, 390, 420, 450°F, default factory
setting is 270°F.
- To select automatic timer setting, press the TIMER button twice (default
factory setting is 0 mins), the timer light will turn a steady red, and press
the “+” until the desired timer setting is achieved. When the timer is
at 150 mins, the LED will show error code EE, will emit a sound for
5 second, and the unit returns to the standby mode.
- The power will completely shut off with 9 second if either (a) the wrong
type of cookware is applied or (b) no cookware is placed on the unit.
- Once you have finished cooking, press the ON/OFF button once to turn
the cooktop off. The fan will keep functioning for some time to cool the
unit down. Once the fan has stopped, unplug the unit. Make sure you
wait for the unit to cool off completely before cleaning & storing.
TIMER
If using the unit in TEMP or HEAT function, not setting the TIMER
function, but when the unit is used for 150 mins, the LED display shows
EE code and sound. The unit will stop automatically.
If using the unit in TEMP or HEAT function for 10 mins, and then set the
TIMER, the max Timer is 140 mins. During timer operation, you can
change the duration at any time with the “-” & “+” buttons.
5