


Pag. 4
INSTALLATION
Before installing the machine, read carefully this manual.
Install the machine in a dry and hygienic place.
ELECTRIC CONNECTION
Before connecting the machine to an electric plug, please follow these precau-
tions:
• The main supply must correspond to the power requirements of the machine
(1600W).
• Check that the power supply voltage correspond to the voltage shown in the
rating label.
• Check that the main socket is correctly earthed.
• If the power supply cable is replaced, use only original type cables (request the
special cable with M type connection to the manufacturer).
The manufacturer will not accept responsibility for any
damage arising if these precautions are not complied
with.
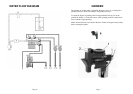
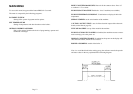
The machine is provided of a general lighted switch, located on the back panel
and of a security push button placed on the chassis that breaks off the power to
the electronic board when you open the door. To restore the power also with the
door opened, take out the push button.
All the electric devices in the machine work with a 24 Vdc voltage, except the
boiler heating element and the transformer that work with 230 or 115 Vac.
Pag. 25
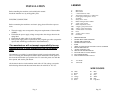
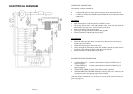
LEGEND
A Main power
B Main switch
C “Anti-interference” filter
D Transformer 230/24 Vac or 120/24 Vac
E Coffee group heating elem. 24 Vac
F Ventilator
G Safety clixon 145°C
H Boiler heating element 1200 W
IP “Door” safety switch
S Boiler temperature sensor
MG “Supply” group-microswitch
MS “Pause” group-microswitch
MD “Coffee-doser” microswitch
GA Float
MC “Token system” contact.
CV Flowmeter
1 GRINDER MOTOR
2 COFFEE-RELEASER SOLENOID
3 COFFEE-GROUP MOTOR
4 COFFEE ELECTRO-VALVE
5 PUMP
7 “MILK & CHOCOLATE” ELECTRO-VALVE & MIXER
8 MILK DOSER-MOTOR
9 “TOKEN SYSTEM” COIL
10 CHOCOLATE DOSER-MOTOR
11 TEA ELECTRO-VALVE & MIXER
12 TEA DOSER-MOTOR
13 HOT WATER ELECTRO-VALVE
F1 1.6A FUSE
F2 10A FUSE
WIRE COLORS
00 black 66 Blue
11 Brown 77 Violet
22 Red 88 Grey
33 Orange 99 White
44 Yellow XX Pink
55 Green YY Light blue