


q
Standard EN 378 specifies that the room in which you install
your appliance must have a volume of 1 m
2
per 8 g of R
600a refrigerant used in the appliance. If the room in which
the appliance is installed is too small, a flammable gas-air
mixture may form in the event of a leakage in the refrigera-
tion circuit. The quantity of refrigerant used in your appliance
is indicated on the type plate on the inside of the appliance.
q
Fit the appliance in stable kitchen units only.
q
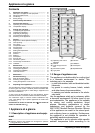
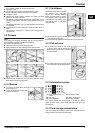
The following ventilation gaps must be observed:
•
The depth of the ventilation channel at the rear of the unit
must be at least 38 mm.
•
There must be a ventilation space of at least 200 cm
2
in
the plinth and at the top of the unit.
•
Basically the principle applies: the larger the ventilation
space, the more energy-saving the appliance is in opera-
tion.
u
Detach the connecting cable from the rear of the appliance,
removing the cable holder at the same time because other-
wise there will be vibratory noise!
After installation:
u
Remove all transit supports.
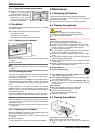
u
Unscrew the red transport
lock. Close the vacated
retaining hole using the
stopper (60).
u
Dispose of packaging material (see 4.3) .
Note
u
Clean the appliance (see 6.2) .
If the appliance is installed in a very damp environment,
condensate may form on the outside of the appliance.
u
Always see to good ventilation at the installation site.
4.3 Disposing of packaging
WARNING
Danger of suffocation due to packing material and plastic film!
u
Do not allow children to play with packing material.
The packaging is made of recyclable materials:
-
corrugated board/cardboard
-
expanded polystyrene parts
-
polythene bags and sheets
-
polypropylene straps
-
nailed wooden frame with polyethylene panel*
u
Take the packaging material to an official collecting point.
4.4 Connecting the appliance
NOTICE
Risk of damage to the electronic control system!
u
Do not use stand-alone inverters (conversion of d.c. to a.c./
three-phase) or energy saving plugs.
WARNING
Fire and overheating hazard!
u
Do not use extension cables or multiple socket outlets.
The type of current (alternating current) and voltage at the
installation site have to conform with the data on the type plate
(see Appliance at a glance).
The socket must be properly earthed and fused. The tripping
current for the fuse must be between 10 A and 16 A.
The socket must be easily accessible so that the appliance can
be quickly disconnected from the supply in an emergency. It
must be outside the area of the rear of the appliance.
u
Check the electrical connection.
u
Plug in the power plug.
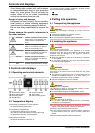
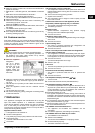
4.5 Switching on the appliance
u
Press On/Off button
Fig. 2 (4)
.
w
The temperature display flashes until the temperature is
sufficiently cold. If the temperature is above 0 °C, dashes
flash. If it is below, the set temperature flashes.
5 Control
5.1 Brightness of the temperature
display
You can adjust the brightness of the temperature display to the
light conditions of the room in which the appliance is installed.
5.1.1 Adjusting the brightness
The brightness is adjustable between h1 (no illumination) and
h5 (maximum luminosity).
u
To activate the setting mode: press the SuperFrost button
Fig. 2 (5)
for about 5 s.
w
The display indicates c.
w
The SuperFrost button flashes.
u
Using the Up setting button
Fig. 2 (3)
or Down setting
button,
Fig. 2 (2)
, select h.
u
To confirm: briefly press the SuperFrost button
Fig. 2 (5)
.
u
To make the display brighter: press Up button
Fig. 2 (3)
.
u
To make the display darker: press Down button
Fig. 2 (2)
.
u
To confirm: press SuperFrost button
Fig. 2 (5)
.
w
The brightness is adjusted to the new value.
u
To deactivate the set-up mode: press On/Off button
Fig. 2 (4)
.
-or-
u
Wait for 5 minutes.
w
The temperature is indicated again in the temperature
display.
5.2 Child proofing
The child-proofing function enables you to make
sure that the appliance is not inadvertently switched
off by playing children.
5.2.1 Setting the child lock
u
To activate the setting mode: press SuperFrost button
Fig. 2 (5)
for about 5 s.
w
The display indicates c.
w
The button SuperFrost flashes.
u
Briefly press the SuperFrost button
Fig. 2 (5)
to confirm.
u
To switch on: Using the Up setting button
Fig. 2 (3)
or Down setting button
Fig. 2 (2)
, select c1.
u
To switch off: Using the Up setting button, freezer
compartment
Fig. 2 (3)
or Down setting button,
freezer compartment
Fig. 2 (2)
, select c0.
u
To confirm: press SuperFrost button
Fig. 2 (5)
.
Control
* Depending on model and options 5