


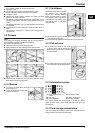

u
When the drawer is pulled out, hold down the On/Off button
(about 10 seconds).
w
After about 1 s the LED goes out, the IceMaker is switched
off.
w
After about 10 s the LED flashes for about 60 s.
u
Slide in the drawer while the LED is flashing.
w
The ice-cube tray of the IceMaker turns to a skew position.
u
Remove the drawer.
u
Clean the ice cube tray with warm water. If necessary, use
mild washing-up liquid. Then rinse.
Switch the IceMaker on again.
u
Press the ON/OFF button until the LED shines, then slide in
the drawer.
w
The IceMaker starts producing ice cubes.
If washing-up liquid was used:
u
throw away the first three loads of ice cubes to get rid of any
remaining washing-up liquid.
6.4 Customer service
First check whether you can correct the fault yourself by refer-
ence to the list (see Malfunction). If this is not the case, please
contact the customer service whose address is given in the
enclosed customer service list.
WARNING
Risk of injury if repair work is not carried out professionally!
u
Have any repairs and action - not expressly specified - on
the appliance and mains cable carried out by service
personnel only. (see Maintenance)
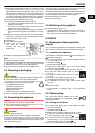
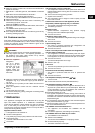
u
Read the appliance
designation
Fig. 8 (1)
, service
No.
Fig. 8 (2)
and
serial No.
Fig. 8 (3)
off the type plate
located inside the
appliance on the left-
hand side.
Fig. 8
u
Notify the customer service, specifying the fault, appliance
designation
Fig. 8 (1)
, service No.
Fig. 8 (2)
and serial No.
Fig. 8 (3)
.
w
This will help us to provide you with a faster and more accu-
rate service.
u
Keep the appliance closed until the customer service
arrives.
w
The food will stay cool longer.
u
Pull out the mains plug (not by pulling the connecting cable)
or switch off the fuse.
7 Malfunction
Your appliance is designed and manufactured for a long life
span and reliable operation. If a malfunction nonetheless
occurs during operation, check whether it is due to a handling
error. In this case you will have to be charged for the costs
incurred, even during the warranty period. You may be able to
rectify the following faults yourself:
Appliance does not work.
→
The appliance is not switched on.
u
Switch on the appliance.
→
The power plug is not properly inserted in the wall socket.
u
Check power plug.
→
The fuse of the wall socket is not in order.
u
Check fuse.
The compressor runs for a long time.
→
The compressor switches to a low speed when little cold is
needed. Although the running time is increased as a result,
energy is saved.
u
This is normal in energy-saving models.
→
SuperFrost is activated.
u
The compressor runs for longer in order to rapidly cool the
food. This is normal.
A LED on the bottom rear of the appliance (at the
compressor) flashes regularly every 15 seconds*.
→
The inverter is equipped with a diagnostic LED.
u
The flashing is normal.
Excessive noise.
→
Speed-controlled* compressors may produce varying
running noise due to different speed steps.
u
The sound is normal.
A bubbling and gurgling noise.
→
This noise comes from the refrigerant flowing in the refriger-
ation circuit.
u
The sound is normal.
A quiet clicking noise.
→
The noise is produced whenever the refrigeration unit
(motor) automatically switches on or off.
u
The sound is normal.
A hum. It is briefly a little louder when the refrigeration
unit (the motor) switches on.
→
The refrigeration increases automatically when the Super-
Frost, function is activated, fresh food has just been placed
in the appliance or the door has been left open for a while.
u
The sound is normal.
→
The ambient temperature is too high.
u
Solution: (see 1.2)
A low hum.
→
The sound is produced by air flow noise of the fan.
u
The sound is normal.
Flow sound at the soft stop mechanism.
→
The noise is produced when the door is opened and
closed.
u
The sound is normal.
The temperature display indicates: F0 to F5.
→
There is a fault.
u
Contact the customer service (see Maintenance).
The temperature display indicates: nA
→
The freezer temperature rose too high over the last hours or
days due to a power failure or power interruption. When the
power interruption is over, the appliance will continue to
operate in the last temperature setting.
u
Press alarm button
Fig. 2 (6)
w
The highest temperature reached during power failure is
indicated in the temperature display for approx. 60 seconds.
The electronic unit then indicates the actual current freezing
temperature again.
u
To prematurely cancel the display of the warmest tempera-
ture: press alarm button
Fig. 2 (6)
.
u
Check the quality of the food. Do not consume spoiled food.
Do not re-freeze thawed food.
The IceMaker cannot be switched on. *
→
The appliance and therefore the IceMaker are not
connected.
u
Connect the appliance. (see Putting into operation).
The IceMaker does not make any ice cubes.*
→
The IceMaker is not switched on.
u
Switch on the IceMaker.
→
The drawer of the IceMaker is not properly closed.
u
Close the drawer properly.
→
The water connection is not open.
Malfunction
* Depending on model and options 9