


Impinger II – Advantage Digital Service Manual - Domestic
21
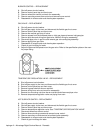
AIR PRESSURE SWITCH – REPLACEMENT
A. Shut off power at main breaker.
B. Remove control panel top and front cover.
C. Disconnect wiring from air pressure switch and mark for reassembly.
D. Disconnect air tube from air pressure switch.
E. Remove two mounting screws and remove air pressure switch.
F. Reassemble in reverse order and check system operation. Be sure to calibrate new air pressure
switch. For proper calibration, see below.
G. Turn adjusting screw on air pressure switch fully counter clockwise.
H. Turn oven “on”.
I. Turn adjusting screw on air pressure switch clockwise until heat shuts off.
J. Turn adjusting screw on air pressure switch counter clockwise ¼ turn.
K. Reassemble control panel top and front cover.
BEARING, CONVEYOR – REPLACEMENT
A. Remove conveyor from oven and place on a flat work surface.
B. Remove connecting links from conveyor belt. See Installation Operations manual for proper
procedure. Remove conveyor belt from conveyor.
C. Move drive shaft or idler shaft toward end of conveyor, and shaft with bearing will now slip out of
conveyor frame.
D. Remove bearing from conveyor shaft.
E. Reassemble in reverse order and check system operation.
MERCURY CONTACTOR – REPLACEMENT
A. Shut off power at main breaker.
B. Remove control panel top and front cover.
C. Disconnect all wires and mark for reassembly.
D. Remove screws from mounting bracket and remove contactor.
E. Reassemble in reverse order and check system operation.
HEATING ELEMENT – REPLACEMENT
A. Shut off power at main breaker.
B. Remove back cover.
C. Disconnect heating element wires and mark for reassembly.
D. Disconnect motor wiring and mark for reassembly.
E. Remove oven back from oven.
F. Remove fan shroud.
G. Heating element may now be unbolted and removed.
H. Check new heating element for proper voltage. Reassemble in reverse order and check for
proper operation.