


EN
4
IMPORTANT SAFETY INSTRUCTIONS
aWARNINGa
To reduce the risk of fire, electrical shock,
or injury when using your wine cooler,
follow these basic precautions:
• Read all instructions before using the wine cooler.
• Never clean wine cooler parts with flammable fluids. The fumes can create a fire
hazard or explosion.
• Do not store or use gasoline or any other flammable vapors and liquids in the vicinity
of this or any other wine cooler. The fumes can create a fire hazard or an explosion.
-Save these instructions-
INSTALLATION INSTRUCTIONS
Before Using Your Wine cooler
• Remove the exterior and interior packing.
• Clean the interior surface with lukewarm water using a soft cloth. (Cleaning instruction on page 7)
Installing Your Wine cooler
• This appliance is designed to be free standing only, and should not be recessed or built-in.
• Allow 5 inches of space between the back and sides of the wine cooler, which allows the proper
air ventilation. Adjust the feet to keep the wine cooler level.
• Locate the wine cooler away from direct sunlight and sources of heat (stove, heater, radiator,
etc.). Direct sunlight may affect the acrylic coating and heat sources may increase electrical
consumption. The ambient temperature is higher than 99°F or lower then 39°F will hinder the
performance of this appliance. This unit is not designed for use in a garage or any other
outside installation.
• Avoid locating the wine cooler in moist areas.
• Plug the wine cooler into dedicated, properly installed-grounded wall outlet. Do not under any
circumstances cut or remove the third (ground) prong from the power cord. Any questions
concerning power and/or grounding should be directed toward a certified electrician or an
authorized service center. This unit is not designed to be installed in an RV or used with an
inverter.
• After plugging the appliance into a wall outlet, turn the unit on and allow the unit to cool down for 3
~ 4 hours under before placing wine bottles in the wine cooler.
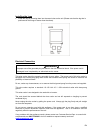
Installing the Spacer
• Important: To ensure good ventilation, please fit the spacer (provided) onto the proper location
(as shown below).