Section 4 Maintenance
Part Number 80-1560-3 4-9
Water Dump Valve
The water dump valve normally does not require
removal for cleaning. To determine if removal is
necessary:
1. Locate the water dump valve.
2. Set the toggle switch to ICE.
3. While the ice machine is in the freeze mode, check
the dump valve’s clear plastic outlet drain hose for
leakage.
A. If the dump valve is leaking, remove,
disassemble and clean it.
B. If the dump valve is not leaking, do not remove
it. Instead, follow the “Cleaning Procedure”.
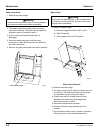
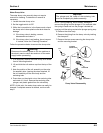
Follow the procedure below to remove the dump valve.
1. If so equipped, remove the water dump valve shield
from its mounting bracket.
2. Lift and slide the coil retainer cap from the top of the
coil.
3. Note the position of the coil assembly on the valve
for assembly later. Leaving the wires attached, lift
the coil assembly off the valve body and the
enclosing tube.
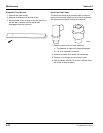
4. Press down on the plastic nut on the enclosing tube
and rotate it 1/4 turn. Remove the enclosing tube,
plunger, and plastic gasket from the valve body.
NOTE: At this point, the water dump valve can easily be
cleaned. If complete removal is desired, continue with
step 5.
NOTE: During cleaning, do not stretch, damage or
remove the spring from the plunger. If it is removed, slide
the spring’s flared end into the plunger’s slotted top
opening until the spring contacts the plunger spring stop.
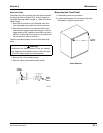
5. Remove the valve body.
6. Remove the tubing from the dump valve by twisting
the clamps off.
7. Remove the two screws securing the dump valve
and the mounting bracket.
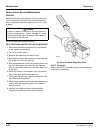
Dump Valve Disassembly
!
Warning
Disconnect the electric power to the ice machine at
the electric service switch box and turn off the water
supply before proceeding.
Important
The plunger and the inside of the enclosing tube
must be completely dry before assembly.
CAP
PLUNGER
SPRING STOP
SPRING
PLUNGER
DIAPHRAM
VALVE BODY
ENCLOSING
TUBE
COIL


