


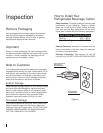


Grounding Method: This product is factory
equipped with a power supply cord that has a three-
pronged grounded plug. It must be plugged into a
mating grounding type receptacle in accordance with
the National Electrical Code and applicable local
codes and ordinances (see figure 1). If the circuit
does not have a grounding type receptacle, it is the
responsibility and obligation of the customer to
exchange the existing receptacle in accordance with
the National Electrical Code and applicable local
codes and ordinances. The third ground prong
should not, under any circumstances, be cut or
removed. All U.L. listed refrigerated products are
equipped with this type of plug.
How to Operate Your
Refrigerated Beverage Center
Set the Control: The total available temperature
range of the unit is from 39°F to the high sixties,
depending on the thermostat setting and location of
the cabinet. The middle range on the control is from
the mid-forties to the mid-fifties depending on ambient
temperature and location of
the cabinet. The tempera-
ture can be lowered or
raised by turning the control
clockwise or counterclock-
wise, respectively. As with
any refrigeration product,
there is a slight temperature variance at different loca-
tions within the cabinet. For example, the coolest area
will be in the rear of the middle of the cabinet.
Commodities on the top shelf will be 3° to 8° warmer.
This section and the bottom cabinet step section are
the warmest areas. Items in the front of the middle
shelves will be 1° to 4° warmer than the rear of the
shelves. Position your wine inventory accordingly on
your wine shelf.
The glass shelves and fixed position wire rack are for
general beverage storage, such as beer and soft
drinks. Opened wine bottles and tall beverage con-
tainers may be stored on the glass shelf closest to the
cabinet top. Just lift the hinged section of the fixed
position upper wire rack to provide clearance for the
bottles and/or containers to stand upright.
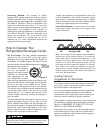
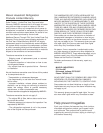
To start your appliance, use a screwdriver to turn the
control clockwise to the middle thermostat setting
(see figure 2). Once the beverage center is loaded,
allow at least 48 hours for the unit to stabilize before
making any adjustments to the initial setting.
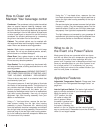
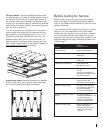
Insert Wine Bottles: The wine rack roll-out shelf
holds eight bottles. See figure 3 for typical wine
bottle orientation.
Note: Wine rack can be located at the middle or
bottom part of the cabinet interior. For red wines,
place wine shelf at bottom shelf position in the
cabinet. Then put a glass shelf in the next higher
position. For white and sparkling wines, put the
wine shelf on the middle shelf position in the cab-
inet. Place the remaining shelves as desired.
Also, there is a fixed, wooden, bottle cradle in the
bottom, step section of the cabinet. Six bottles of
wine may be stored there.
Loading Tips and
Suggestions for Wine Rack
The wooden, bottom bottle cradle may be removed for
storing "jug" wines. Just remove the two screws that
secure the cradle to the cabinet floor.
You can store magnum bottles and other large bottles
on any of the shelves (except for the top shelf) by
removing the shelf directly above them or placing the
shelf at a position allowing for proper clearance.
Commodities on the top rack directly under the light will
be exposed to a slightly higher temperature when the
light is on. REMEMBER TO TURN OFF THE LIGHT
WHEN IT IS NO LONGER NEEDED.
Keep wines that you plan to use for everyday drinking
and entertaining on the front half of the racks where
labels are completely visible. Place wines for aging or
longer term storing in rear.
2
Figure 2
Control Knob
(At bottom right
section of grille)
Front Bottles (Necks Facing Rear)
Rear Bottles (Necks Facing Front)
Figure 3
Do not pull out upper glass shelf when tall bottles are placed
upright through the opening in the hinged wire shelf. Doing
so may cause the tall, upright bottles to fall backwards.