


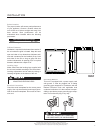


Condenser
The condenser tubing inside the cabinet does not
require frequent cleaning; however, satisfactory
cooling depends on adequate ventilation over the
coils. Be sure that nothing obstructs the required
air flow openings in front of the cabinet. At least
once or twice a year brush or vacuum lint and dirt
from the condenser for efficient performance by
unscrewing the grille on the bottom front of the
cabinet.
Cabinet
The painted cabinet can be washed with mild soap
and water and thoroughly rinsed with clear water.
Never use abrasive scouring powders.
Interior
Wash interior compartment with mild soap and
water. Do not use an abrasive powder, solvent,
polish cleaner or undiluted detergent.
Glass Door
Use a glass cleaner or mild soap and water and
soft cloth to clean the glass door model. Do not
use any abrasive powders.
Door Gasket
The vinyl gasket may be cleaned with mild soap
and water, a baking soda solution or a mild
scouring powder.
Light Tube Replacement
WARNING! DISCONNECT THE POWER CORD
BEFORE ATTEMPTING LIGHT TUBE
REPLACEMENT. Failure to do so may result in an
electrical shock that could severely injure you.
This product uses two, 6 watt light tubes to
illuminate the interior of the unit. The light tubes
are very reliable electrical components, but should
either or both light tubes not function properly,
please call the dealer you purchased your unit
from for replacement light tubes. Use only original
equipment light tubes from your dealer or
manufacturer.
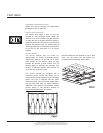
Light tube replacement consists of using a small
phillips head screwdriver to remove the two
screws that hold a cover plate over the back
section of the light tube. Set the screws and cover
plate aside for re-assembly later.
Using a small flat-blade screwdriver, gently lever
the front section of the light tube down to allow it
to be pulled clear of the light housing.
Disconnect the two insulated electrical connectors
from the cabinet’s electrical cable and discard the
old light tube. Reconnect the insulated electrical
connector of the new light tube to the cabinet’s
electrical cable connectors. Make sure they are
secure and fully inserted.
Carefully realign the light tube’s electrical
terminals back into the rear of the light enclosure
channel making sure not to crimp them. Gently
insert the light tube along the length of the light
enclosure channel. Press the light tube gently into
the light enclosure channel. Only a small part of
the light tube should project below the ceiling of
the unit. DO NOT USE A HAMMER TO FIT THE
LIGHT TUBE.
Place the light tube terminal cover plate back in its
original position on the light enclosure’s flange.
Re-use the original two screws to secure it in
place. Plug the unit into the electrical socket.
Check to see if the light tubes operate properly.
Your light tube’s replacement is complete.
The light tubes are not covered by your guarantee.
Replacement tubes can be obtained from your
service provider or from Marvel Industries.
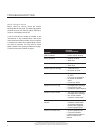
CLEANING AND MAINTAINING
All specifications and product design subject to change without notice.
Such revisions do not entitle the buyer to corresponding changes, improvements,
additions, replacements or compensation for previously purchased products.
5