


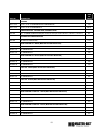

8
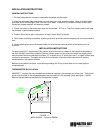
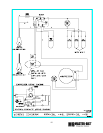
CONDENSATE EVAPORATOR
The MPM/QMPM is designed to operate in an environment of 75° ambient and 55% relative humidity. When
the conditions are applicable for condensation such as high temperature and high humidity, a large capacity
condensate evaporator has been installed in the MPM/QMPM to ensure proper evaporation.
POWER TOGGLE SWITCH
The toggle switch turns the power ON or OFF and is accessible through a slot at the back of the MPM/QMPM-
36 and MPM/QMPM-48 cabinet.
NOTICE TO STORE OWNERS / MANAGERS
Moisture or liquid around or under the cabinet is a potential slip/fall hazard for persons walking by or
working in the general area of the cabinet. Any cabinet malfunction or housekeeping problem that
creates a slip/fall hazard around or under the cabinet should be corrected immediately.
If moisture or liquid is observed around or under a Master-Bilt cabinet, an immediate investigation should be
made by qualified personnel to determine the source of the moisture or liquid. The investigation made should
determine if the cabinet is malfunctioning or if there is a drain pipe leaking.
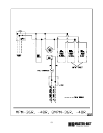
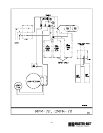
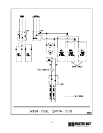
ELECTRICAL
WARNING
Before servicing electrical components in the case make sure all power to case is off. Always use a
qualified technician.
STARTING PROCEDURE
1. Start compressor and allow to run at least 6 hours before placing product into the MPM/QMPM.
DURING THIS TESTING PERIOD YOU SHOULD:
1. Check the temperature holding range against the the control setting.
2. Check the defrost control system to see that all ice is removed from the coil during each defrost cycle.
3. Check pressures.
FINAL CHECK LIST
A. Check setting of defrost timer:
1. Verify setting of four 34
minutes defrost
per 24 hours.
B. Check operating pressures.
C. Check electrical requirements of unit to
supply voltage.
D. Set temperature control for desired
temperature range.
E. Check system for proper defrost operation.
F. Check condensing unit for vibrating or
rubbing tubing. Dampen and clamp as
required.
G. All valves should be completeley open
counter-clockwise.
H. Check packing nuts on all service valves.
I. Replace all service valve caps and latch
unit covers