


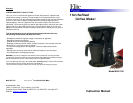

HINTS FOR GREAT TASTING COFFEE
• A clean coffeemaker is essential for making great tasting coffee. Regularly clean
the coffeemaker as specified in the “Care and Cleaning” section.
• Always use fresh, cold water in the coffeemaker.
• Finer coffee grinds, such as drip and Automatic Drip Coffeemaker (ADC) coffee
grinds, promote a full extraction of flavor and a rich, full-bodied coffee. Regular
coffee grinds require slightly more coffee per cup to provide the strength of a
finer coffee grind.
• Store unused coffee grounds in a cool, dry place. After a package of coffee
grounds has been opened, tightly reseal it for storage in a refrigerator to maintain
its freshness.
• For an optimum coffee taste, buy whole coffee beans and finely grind them just
before brewing.
• Do not reuse coffee grounds since this will greatly reduce the coffee’s flavor.
• Re-heating coffee is not recommended as coffee is at its peak flavor immediately
after brewing.
• Clean the coffeemaker when over-extraction causes oiliness. Small oil droplets
on the surface of brewed, black coffee are due to the extraction of oil from the
coffee grounds. Oiliness may occur more frequently if heavily roasted coffees
are used.
….Care and Cleaning..
CAUTION: Always unplug the coffeemaker from electrical outlet.
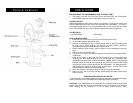
• Clean the Root External Cup, the Filter cone and the Cup after each use in hot,
sudsy water.
• Wipe the exterior surface of the coffeemaker with a soft, damp cloth to remove
stains. For stubborn stains, use a nylon or plastic pad with a non-abrasive
cleaner. Do not use metal scouring pads or abrasive cleaners.
• To keep your coffeemaker operating efficiently, you must clean away mineral
deposits left by the water. At least once a month use a household cleaning
solution, as described below, to prevent the build up of mineral deposits. You
should clean your coffeemaker at least every two (2) weeks if the water in your
area is especially high in minerals. Frequent cleaning may also improve the
flavor of the coffee.
Household Cleaning Solution
1. Fill the Cup with one (1) part of white vinegar and three (3) parts of cold water.
2. Pour the water and vinegar mixture into the Water Reservoir.
3. Slide the Cup onto the Cup Plate.
4. Press the Power Switch, the indicator light will illuminate. NOTE: During cleaning
more steam occurs than when brewing coffee.
5. Once the Cup is half-filled, press the Power Switch, and the indicator light will
extinguish.
6. When the water-vinegar solution stops dripping from the Root External Cup into
the Cup, remove the filter and Cup; then allow the water-vinegar mixture to cool
in the Cup for fifteen (15) minutes. Once cool, pour the water-vinegar mixture
into the Water Reservoir again.
7. Press the Power Switch, the indicator light will illuminate.
8. Repeat the cleaning procedure and allow all of the cleaning solution to drip into
the Cup; then press the Power Switch, and the indicator light will extinguish.
9. Remove the paper filter from the Filter Basket and discard the cleaning solution
from the Cup.
10. Allow the coffeemaker to cool ten (10) minutes; then rinse the coffeemaker by
brewing a Cup of cold water. Be sure to insert a fresh filter into the Filter Basket
before brewing.
11. Press the Power Switch and the indicator light will extinguish.
12. Allow the coffeemaker to completely cool before cleaning. Wash the Cup, the
Root External Cup, the Internal Cup and the Filter cone; then thoroughly rinse
and dry. Wipe the coffeemaker Base with a dry cloth.
.. Short Cord Purpose ..
1) A short power-supply cord is provided to reduce risks of injuring yourself from
becoming entangled in or tripping over a longer cord.
2) Longer extension cords are available and may be used if you exercise caution
during use.
3) If a longer cord is used please note the following:
- The marked electrical rating of the extension cord should be at least as
great as the electrical rating of the appliance.
The longer cord should be arranged so that it will not drape over the counter top of
tabletop where it can be pulled on by children or tripped over unintentionally.
…Polarized Plug …
If this appliance has a polarized plug (meaning one blade is wider than the other one), please follow the
below instructions:
To reduce the risk of electric shock, this plug is intended to fit into a polarized outlet only in one direction.
If the plug does not fit fully into the outlet, reverse the plug. If it still does not fit, contact a qualified
electrician. Do not attempt to modify the plug in any way.
This appliance is intended for Household Use Only