


10
ELECTRONIC OVEN CONTROLS
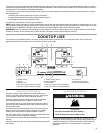
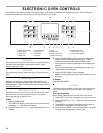
This manual covers different models. The range you have purchased may have some or all of the items listed. The locations and
appearances of the items shown here may not match those of your model.
Display
When power is first supplied to the range, or if a power failure has
occurred, 12:00 will appear on the display. See the “Clock”
section to set time of day.
Cancel
Cancel stops any function except the Clock, Timer and Control
Lock.
Oven Lights
While the oven doors are closed, press OVEN LIGHT on the
keypad to turn the lights on and off. Both oven lights will come on
when either door is open. The oven lights will not come on during
the Self-Clean cycle.
Kitchen Timer
The Kitchen Timer can be set in hours or minutes up to 9 hours
and 59 minutes, and counts down the set time. The Kitchen
Timer does not start or stop the oven.
To Set:
1. Press KITCHEN TIMER.
“Set TIMER” will display in the upper text area, and the clock
will display “--:--” with the colon flashing.
2. Press the Temp/Time “+” or “-” pads until the desired time is
reached.
3. Press KITCHEN TIMER to start the timer. The colon stops
flashing, and the time begins counting down. “TIMER
Started” will scroll down the upper text display area.
The last minute of the timer countdown will be displayed in
seconds.
At the end of the set time, one long beep will sound, and
“TIMER End” will be displayed.
4. Press KITCHEN TIMER to clear the display.
NOTE: A reminder beep will sound until the Kitchen Timer is
canceled.
To Cancel:
Press KITCHEN TIMER.
Clock
To change the clock between 12-hour and 24-hour format, see
“12/24 Hour (Adjusting the Clock Format)” in the “Settings”
section.
To Set the Time of Day:
Before setting, make sure the oven and Oven Timer are off.
1. Press CLOCK. “Set Time” will appear in the upper text area.
2. Press the Temp/Time “+” or “-” pads until the desired time is
displayed.
3. “Press CLOCK” will appear in the upper text area, and “or
Push START” will appear in the lower text area.
4. Press CLOCK or START. “Time Set” will appear in the upper
text area. Once it disappears, the time is set.
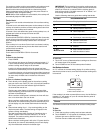
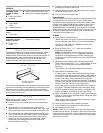
A.Upper oven settings
B.Oven display
C.Cook time
D.Delay start
E.Power preheat
F. Oven light
G.Self clean
H.Settings
I.Clock
J.Kitchen timer
K.Lower oven cancel
L.Upper oven cancel
M.Start/control lock
N.Temp/time “+” and “-”
O.Lower oven settings
A
D
E
G
H
I
J
K
L
M
N
O
B
C
F