


14
15
INTRODUCTION
To get the most out of your new deep fat fryer, please
read through these instructions carefully before using
it for the first time. Take particular note of the safety
precautions. We also recommend that you keep the
instructions for future reference, so that you can remind
yourself of the functions of the deep fat fryer.
SAFETY MEASURES
Normal use of the deep fat fryer
• Incorrect use of the deep fat fryer may cause
personal injury and damage to the appliance.
• Use the deep fat fryer for its intended purpose only.
The manufacturer is not responsible for any injury
or damage resulting from incorrect use or handling
(see also Guarantee Terms).
• Do not use any accessories other than those
recommended by the manufacturer.
• The deep fat fryer may only be connected to 230 V,
50 Hz.
• The deep fat fryer should not be switched on unless
it is full of oil. Ensure that it is always filled with oil
up to a level somewhere between the minimum and
maximum level marks on the inside of the bowl.
• Avoid using the deep fat fryer for too long in one go,
as this can result in the oil overheating, causing a
fire.
• Never add water to the oil. This is extremely
dangerous and may cause the oil to spit violently
from the bowl!
• Avoid contact with the hot oil.
• Never leave the deep fat fryer unattended when in
use or when it is hot, and keep an eye on children.
• Touch only the black plastic handles; avoid touching
the other surfaces, as they can become extremely
hot.
• Always set the temperature control to the lowest
possible temperature, and unplug the fryer as soon
as you have finished cooking the food.
• Wait until the deep fat fryer has cooled down
completely before draining the oil out, moving or
cleaning the fryer or putting it away.
• Always use the carrying handles to move the deep
fat fryer.
• The deep fat fryer or the cord must not be immersed
in water or any other liquid.
• Never use the deep fat fryer with wet hands.
• Make sure the deep fat fryer is always clean when it
comes into contact with food.
• This deep fat fryer is not suitable for commercial or
outdoor use.
• Only use the deep fat fryer in a dry and well-
ventilated room.
Positioning the deep fat fryer
• Place the deep fat fryer on a flat, level and stable
surface.
• Always place the deep fat fryer at the back of
a kitchen counter and at a safe distance from
flammable objects such as curtains, cloths or
similar.
• Do not cover the deep fat fryer.
• Do not allow the cord to hang over the edge of
a table/counter, and keep it away from the hot
surfaces of the fryer and other hot objects and
naked flames.
Cord, plug and mains socket
• Check regularly that the cord and plug are not
damaged and do not use the deep fat fryer if this is
the case, or if the appliance has been dropped or
damaged in any other way. If the appliance, cord or
plug is damaged, the appliance must be inspected
and, if necessary, repaired by an authorised repair
engineer, otherwise there is a risk of electric shock.
Never try to repair the appliance yourself.
• Check that it is not possible to pull or trip over the
deep fat fryer cord or any extension cable.
• Remove the plug from the socket when cleaning, or
when the deep fat fryer is not in use.
• Avoid pulling the cord when removing the plug from
the socket. Instead, hold the plug.
• Do not roll the cord up or wind it around the deep
fat fryer.
Important!
If a fire starts in the deep fat fryer, you must never
try to put it out with water! Instead, close the lid and
try to smother the flames with a damp cloth or wet
towel.
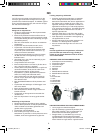
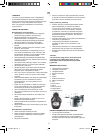
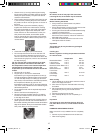
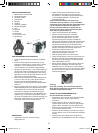
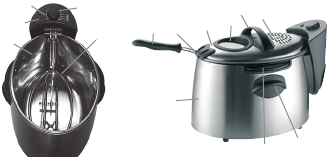
KEY
1. Control panel with power cord
2. Temperature indicator
3. Temperature control
4. Heating element
5. Bowl
6. Casing
7. Casing carrying handle
8. Bowl carrying handle
9. Basket
10. Basket handle
11. Lid
12. Lid handle
13. Anti-odour filter
14. Inspection window
PRIOR TO FIRST USE
• Read the safety instructions through carefully.
• Remove all packaging from the deep fat fryer and
place it on a flat, stable surface, e.g. a kitchen
counter, and at a safe distance from flammable
objects.
UK
1.
2.
3.
4.
5.
6.
14.
13.
7.
12.
11.
9.
10.
8.
JA-D801_IM.indd 14 20/10/05 15:37:01