


14
15
INTRODUCTION
To get the best out of your new appliance, please read this user guide carefully
before using it for the rst time. Take particular note of the safety precautions. We
also recommend that you keep the instructions for future reference.
IMPORTANT SAFETY PRECAUTIONS
General
• Only to be used for its original purpose, i.e. washing of plates, glasses, cutlery
and similar general household items.
• Avoid using the dishwasher to wash kitchen equipment that is not heat-resistant.
Also avoid washing delicate objects, such as crystal glasses, and objects
made from copper, tin and aluminium in the dishwasher, as these can become
damaged.
• For domestic use only. Not for outdoor or commercial use.
• Keep an eye on any children in the vicinity of the appliance when it is in use.
Children must not be allowed to use the appliance unless supervised by an
adult.
• Detergent must always be stored out of reach of children, as it is highly toxic.
• Make sure that detergent does not come into contact with the eyes or skin.
• Never use solvents or thinners in the appliance, as these can cause explosions
or re.
• Do not spray water onto the outside of the appliance and never immerse it in
water, as this can cause short-circuits in the electrical system.
• Never insert anything into the ventilation slots or other openings.
• Do not allow persons or heavy objects to rest on the door when it is open. This
can cause the door and hinges to become deformed and cease functioning
correctly.
• Never try to repair the appliance yourself. If the appliance, cable or plug needs
to be repaired, it should be taken to an authorised service centre. Unauthorised
repairs or modications will invalidate the guarantee. Please contact the store
where you bought the appliance for repairs under guarantee.
Positioning the appliance
• Do not place the appliance or the cord near hot areas, for example gas rings and
electric hotplates.
• Do not remove the feet.
• Not suitable for integral installation. Ensure the vent holes on the front of the
door and the back of the cabinet are not covered. If they are covered while the
appliance is in use, there is a risk of it overheating.
Connection
• For connection to 230 V, 50 Hz only. The guarantee is not valid if it is connected
to the wrong voltage.
o The appliance should only be connected to sockets with a functioning earth
circuit that is suitable for the mains plug.
o Position the appliance so that the cord can easily reach the socket without being
in the way or posing a safety hazard.
o The appliance is equipped with a safety function that switches it off
automatically in the event of any irregularity in the power supply.
• The appliance must normally be connected to the hot water supply.
o If the hot water supply temperature cannot be kept below 65 ºC, the appliance
must be connected to the cold water supply instead.
Use
• Do not use the appliance if the cable or plug are damaged, if it is not functioning
properly, or if it has been damaged by a heavy impact or similar.
• If the door is left open, you risk being exposed to hot steam. Water damage can
also occur.
o Do not open the door when the display shows "High temperature", as very hot
steam inside the appliance can cause burns.
o Keep children away from the appliance when the door is opened.
o Do not use if the safety locking system is not functioning, which means that the
appliance could be switched on even if the door is not closed.
• Avoid touching the heating element in the base of the appliance (below the lter)
immediately after use, as this can be very hot.
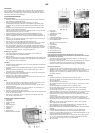
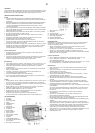
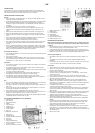
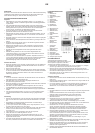
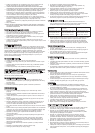
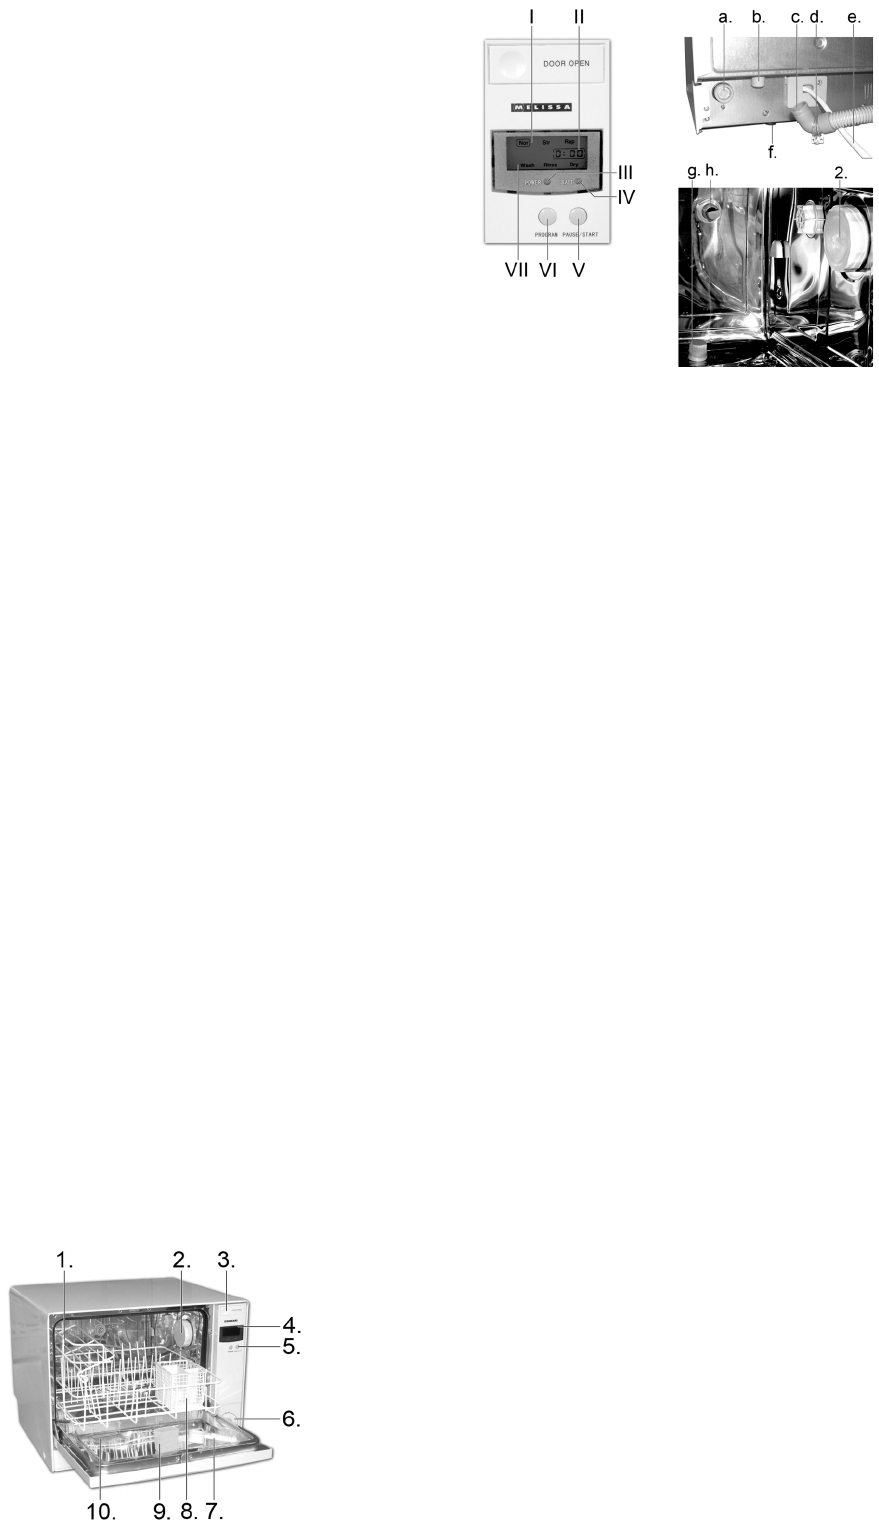
KEY TO MAIN COMPONENTS OF THE APPLIANCE
1. Washing rack
2. Salt container
3. Door release button
4. Display
5. Control buttons
6. On/Off button
7. Measuring spoon
8. Cutlery basket
9. Filler cap
10. Detergent compartment
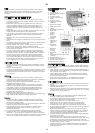
a. Water intake
b. Drainage nozzle
c. Drainage hose (disconnected)
d. Hose clip
e. Power cord
f. Height-adjustable legs
g. Surface-active agent container
cover (removed)
h. Surface-active agent container
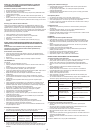
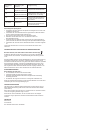
I. Displays selected wash program
II. Displays time
III. On/off indicator
IV. Salt indicator
V. Pause/start button
VI. Program selector button
VII. Displays program cycle
PREPARING THE APPLIANCE
Each individual appliance is checked at the factory, but for safety’s sake, after
unpacking it, you should check carefully that it has not been damaged during
transport.
• Check whether there is any visible damage (e.g. in the form of dents or similar),
if the door closes properly, and if the hinges are in order.
• If the appliance appears to have been damaged, contact the shop where you
bought it, and do not use it until it has been checked by an authorised specialist.
• Before use, check that you have removed all packaging inside and out.
Positioning the appliance
• The appliance must stand on a at surface capable of bearing its weight (17.3
kg).
• The appliance must be level – adjust the four height-adjustable legs (f) if
necessary.
• For domestic use only. There must be a clearance of at least 10 cm at the rear, 5
cm at the sides and 48 cm above to ensure sufcient ventilation.
Connection
• The microwave oven must be connected to a 230-volt AC current, 50 Hz.
• Always use new hoses when installing the appliance. Old hoses should not be
reused for new installations.
• Screw the hose to the water supply at the water intake (a).
o The water intake on the appliance ends in a ¾" female plug – check that the
correct hose is used.
o Do not tighten the connection too much, as this can damage the thread.
o There should be a stopcock connected to the hose, so it is easy to disconnect
the water supply to the appliance.
o Water can be supplied from a normal tap, but it is recommended that the
appliance be connected to a permanent water supply, if possible. You must
ensure that the correct spacers or adapters are used to connect the appliance in
a safe and secure manner.
o The appliance uses water with a temperature of 55 ºC, and it is therefore
normally connected to the hot water supply.
If the hot water supply temperature cannot be kept below 65 ºC, the appliance
must be connected to the cold water supply, as it may be damaged by water
that is too hot.
o Water pressure must be between 0.03 MPa and 1.0 MPa to ensure good results.
o The appliance is equipped with a water level gauge, which ensures that the
appliance stops automatically if there is a drop in water pressure.
• Attach the drainage hose (c) to the drainage nozzle (b) using the hose clip (d).
Tighten the hose clip until the hose is secure.
o NOTE: TAKE CARE WHEN TIGHTENING THE HOSE CLIP, AS IT HAS SHARP
EDGES.
o The drainage hose is fed upwards like an upturned U over the accompanying
plastic U-bend (not shown) before being fed downwards into the drain. This
prevents drainage water owing back into the appliance. For increased
protection, a reux valve (not included) can be used.
o The drainage hose should be fed down into a drainage pipe, which must be no
higher than max. 15 cm above the base of the appliance. The drainage pipe
diameter should be at least 30 mm in order to ensure that air can escape around
the drainage hose.
• Switch on the power.
UK