


will increase the risk of electric shock.
• If any parts of the appliance casing breaks, im-
mediately disconnect the appliance from the wall
socket to prevent the possibility of an electric
shock.
• Do not use the appliance if it has fallen or if there
are visible signs of damage.
• Do not use the appliance with wet hands or when
barefoot.
• Do not tug or pull the power cable. Never lift, carry
or unplug the appliance by pulling on the power
cable.
• Do not wrap the power cable around the appliance.
• Ensure that the power cable does not become
knotted or tangled.
• Do not allow the power cable to come into contact
with the appliance’s hot surfaces.
• Check the state of the power cable before use. A
damaged or tangled power cable will increase the
risk of electric shock and is a fire hazard.
• Do not touch the plug with wet hands.
Cookware Selection:
•Proper Cookware:
Cookware made from a ferrous (or magnetic) metal
or cookware with a base coated with a magnetic/
induction material, such as enamel, cast iron or
stainless steel is required for the induction cooker
to work.
Improper Cookware:
Cookware made of ceramic, glass, aluminum and
bronze, cookware with uneven bottom, cookware
with an aluminum encapsulated base will not work
with an induction cooker.
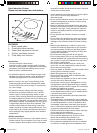
Operating Instruction:
• Unroll the power cable.
• Place the cooking pot in the centre of the black
crystal plate.
•Add cooking ingredients.
• Plug the cooker into the wall socket ensuring the
voltage of the wall socket corresponds to the volt-
age on the rating label at the base of the product.
The induction cooker will make a “Beep” sound
and the digital display will indicate ‘----’.
•Press the ‘ON/OFF’ button to commence cook-
ing. Instructions on different cooking modes and
programming are discussed later in this instruction
manual.
• After cooking, press the ‘ON/OFF’ button and the
induction cooker will automatically turn to “cooling”
mode. The appliance will power down after 30
seconds.
• Unplug the power cable from the wall socket.
Use:
•Press the ‘ON / OFF’ button, the ‘Stir Fry’ preset
function will automatically be selected, this is the
maximum power mode. When you are finished
cooking, press the ‘ON / OFF’ button again to
switch the cooker off. The fan will continue to oper-
ate for another 30 seconds in order to cool the unit.
‘STIR FRY’ Function
•Press the ‘ON / OFF’ button and the ‘Stir Fry’ preset
will be selected automatically which starts with
maximum power. You are able to adjust power
between 100W-2000W by pressing the ‘UP’ or
‘DOWN’ button until the desired heat is reached.
‘HIGH’ (High heat ) Function
•Press the ‘FUNCTION’ button until the pilot light
next to the ‘High’ icon is illuminated. The func-
tion will automatically increase the heat to 240°C.
Press the ‘UP’ or ‘DOWN’ button in order to adjust
temperature between 80~240°C.
‘SAUTÉ’ Function
•Press the ‘FUNCTION’ button until the pilot light
next
to the “SAUTÉ” icon is illuminated, the cooker will
instantly increase the cooking power by 100~200W
for 3 minutes and then automatically change back
to
‘High’ Function.
‘MED’ (Medium heat) Function
•Press the ‘FUNCTION’ button until the pilot light
next to the “MED” icon is illuminated. The “MED”
function works intelligently and can automatically
control the temperature. Whilst consuming minimal
power it will maintain a medium to low temperature.
When using this function, the appliance will auto-
matically switchoff after two hours.
‘PORRIDGE’ Function
•Press the ‘FUNCTION’ button until the pilot light
next to the “PORRIDGE” icon is illuminated. The
“PORRIDGE” function works intelligently and will
automatically control the power. This function
will switch off the appliance when the porridge is
cooked optimally.
‘SOUP’ Function
•Press the ‘FUNCTION’ button until the light next to
the “Soup” icon is illuminated. The “SOUP” func-
tion
works intelligently and will automatically control the
power. This function will switch off the appliance
when the soup is cooked optimally.
‘BRAISING’ Function
•Press the ‘FUNCTION’ button until the pilot light
next to the “BRAISING” icon is illuminated. The
“Braising” function works for a default time of 10
minutes. This function can be used to braise your
food. Press the ‘TIMER’ button to adjust the cook-
ing time between 10~120 minutes. It will automati-
cally turn off when the time is up.
‘LOW’ (Low Heat) Function
•Press the ‘FUNCTION’ button until the “LOW” func-
tion is illuminated. ‘LOW’ function works intelligent-
46004_IM.indd 3 1/21/2014 4:14:59 PM