


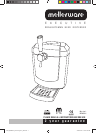
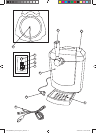

Description:
A Body
B Lid
C Dispenser lever and handle
D Rubber connectors and clips
E Removable drip-tray with grill
F 12V DC cable (connects to cigarette lighter
slot)
G 230V AC cable with plug (for home use)
H 12V DC connection
I 230V AC connection
J Temperature selector control
K Power voltage and selector control and stop
Safety tips and precautions
- Read these instructions carefully before
switching on the appliance and keep them for
future reference. Failure to follow and observe
these instructions could lead to an accident.
- Clean all the parts of the product that will be in
contact with food, as indicated in the cleaning
section, before use.
Use or working environment:
- Do not place the appliance on hot surfaces like
cooking plates, gas burners, ovens or similar.
- Place the appliance on a horizontal, flat and
stable surface.
Electrical safety:
- Do not use the appliance if the cable or plug is
damaged.
- Ensure that the voltage indicated on the rating
label and voltage selector matches the mains
voltage before plugging in the appliance.
- The appliance’s plug must fit into the mains
socket properly. Do not alter the plug. Do not use
plug adaptors.
- Only use the appliance with the specific plugs
and cables provided.
- Do not use or store the appliance outdoors.
- Do not leave the appliance out in the rain
or exposed to moisture. If water gets into the
appliance, this will increase the risk of electric
shock.
- If any of the appliance’s casing breaks,
immediately disconnect the appliance from the
mains to prevent the likelihood of an electric
shock.
- Do not use the appliance if it has fallen on the
floor, if there are visible signs of damage or if it
has a leak.
- Do not force the electrical connection wire.
Never use the electric wire to lift up, carry or
unplug the appliance.
- Do not wrap the power cord around the
appliance.
- Ensure that the electric cable does not get
trapped or tangled.
- Keep the appliance well away from heat
sources, oil, sharp edges or moving parts.
- Check the state of the electrical connection
cable. Damaged or tangled cables increase the
risk of electric shock.
- Do not touch the plug with wet hands.
Use and care:
- Fully extend the appliance’s power cable before
each use.
- Do not use the appliance if its accessories are
not properly fitted.
- Do not use the appliance if the on/ off switch
does not work.
- Do not move the appliance while in use.
- Do not turn the appliance over while it is in use
or connected to the mains.
- Unplug the appliance from the mains when not
in use and before undertaking any cleaning task.
- This appliance is for household use only, not
professional or industrial use.
- This appliance is not a toy. Children should be
supervised to ensure that they do not play with
the appliance.
- This appliance is intended for adult use only.
Ensure that this product is not used by the
disabled, children or anyone under the age of 18
years of age.
- This appliance should be stored out of reach of
children and/or the disabled.
- Do not put the appliance away in a horizontal
position.
- Do not put the appliance away if it is still hot.
- Do not expose the appliance to extreme
temperatures.
- Check that the lid is closed properly before
starting the appliance.
- Do not use the appliance to store open beer
kegs.
- Any misuse or failure to follow the instructions
for use renders the guarantee and the
manufacturer’s liability null and void.
Installation:
- Do not cover or obstruct any of the openings of
the appliance.
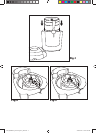
Installing the beer keg:
- The appliance is suitable for use with 4, 5 and
6 litre beer kegs (pressurised), which are sold in
most major liquor outlets.
- Read the installation procedure and
instructions for use, as provided by the beer keg
manufacturer, very carefully before installing the
keg into this appliance.
- Make sure the use by date of the beer keg has
not passed.
- Open the lid (B) and place the beer keg in the
cavity of the appliance (Fig.1)
- Ensure that the tap of the keg is in the “Close”
position
- Attach the rubber connectors to the beer keg
outlet hose (Fig.2 & Fig.3) making sure the
clamps are secured tightly.
MW_BDM001_Beer Dispenser_IM.indd 4MW_BDM001_Beer Dispenser_IM.indd 4 2008/07/22 08:46:50 AM2008/07/22 08:46:50 AM