


3
English
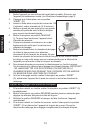
Assembly Instructions
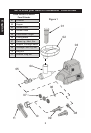
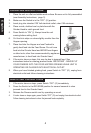
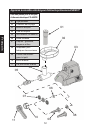
1. Carefully unpack unit and examine all packaging to make sure all parts are included
(See page 2)
2. Clean all parts prior to using.
3. Place unit on a at stable surface.
4. Make sure Switch is “OFF” (O)
and power cord unplugged before
assembling.
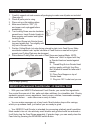
5. Turn Locking Screw counter-clockwise
several turns. Insert Grinder Head into
Base opening until seated and tighten
Locking Screw.
6. Insert Feed Screw into Grinder Head,
long end spindle rst. Turn slightly until
fully set in Grinder Head.
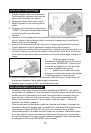
7. Position Cutting Blade (cut edge facing outward to plate) onto Feed Screw. Make
sure blade is seated over ‘square’ shoulder of Feed Screw or meat will not grind
properly and Cutting Plate may be damaged.
8. Place desired Cutting Plate over end of Feed Screw and against Blade. NOTE:
Make sure “notch’ is aligned with ‘key’
in Grinder Head and seated against
Blade.
9. Thread Ring Nut on Grinder Head
and turn gently until tight. Use Ring
Nut Wrench to loosen Nut after use if
needed.
10. Place Food Hopper on top of
Grinder Head.
11. Plug into 120 V outlet and you are
ready to begin grinding.
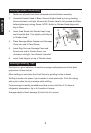
NESCO Professional Food Grinder - A Healthier Diet
• With your own NESCO Professional Food Grinder, you control the ingredients.
You control the amount of fats, salts and other additives, for a healthier diet. Chunky
sandwich spreads, savory appetizers, hearty soups, relishes, homemade sausage,
other meat dishes. . . even cakes are so easy to make.
• You can make sausages out of any foods. Most butcher shops offer casings,
which you purchase fresh, just before you are ready to grind.
• Your NESCO Food Grinder is intended for processing relatively small quantities.
Meat needs to be cut into relatively small chunks and gristle should be removed or
it will likely clog the Feed Screw assembly. If grinder clogs, you can easily clear the
Feed tube by pressing the REVERSE switch button.