


ENGLISH
23
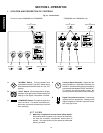
III. MAINTENANCE - EVERY 3 MONTHS
A. Check that the oven is cool and the power is disconnected,
as described in the warning on Page 20.
B. Vacuum both of the blower motors, and their surrounding
compartments, using a shop vacuum.
C. Tighten all electrical control terminal screws.
D. For split belt ovens ONLY, disassemble, clean and lubricate
the conveyor shaft components as described below.
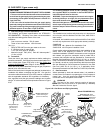
1. Remove the motor shroud, conveyor extensions, and
conveyor as described in Part II, Monthly Maintenance.
2. Remove the master links from each conveyor belt.
Then, roll the belts up along the length of the conveyor
to remove them from the frame.
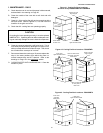
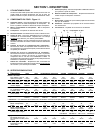
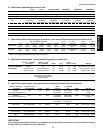
3. Remove the two conveyor adjustment screws from the
idler end of the conveyor frame, as shown in Figure 4-
6.
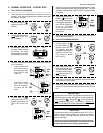
4. For PS360EWB and PS360WB70 ovens, remove the
socket head screw as shown in the inset drawing.
Then, loosen the locking collar set screw. Push the
shaft assembly toward the locking collar until it is free.
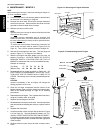
5. Remove the idler shaft assembly from the conveyor.
6. Pull apart the two sections of the idler shaft. Clean the
shafts thoroughly using a rag. Then, lubricate both the
extended shaft and the interior of the hollow shaft using
a light food-grade lubricant.
CAUTION
DO NOT lubricate the shafts using WD40 or a similar
product. This can cause the shafts to wear rapidly.
7. Before reassembling the shafts into the conveyor frame,
check that they are oriented properly. Remember that
unequal-width split belt ovens should ALWAYS have
the narrower belt at the front of the oven.
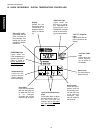
8. Reassemble the idler shaft into the conveyor. For all
ovens except the PS360EWB and PS360WB70,
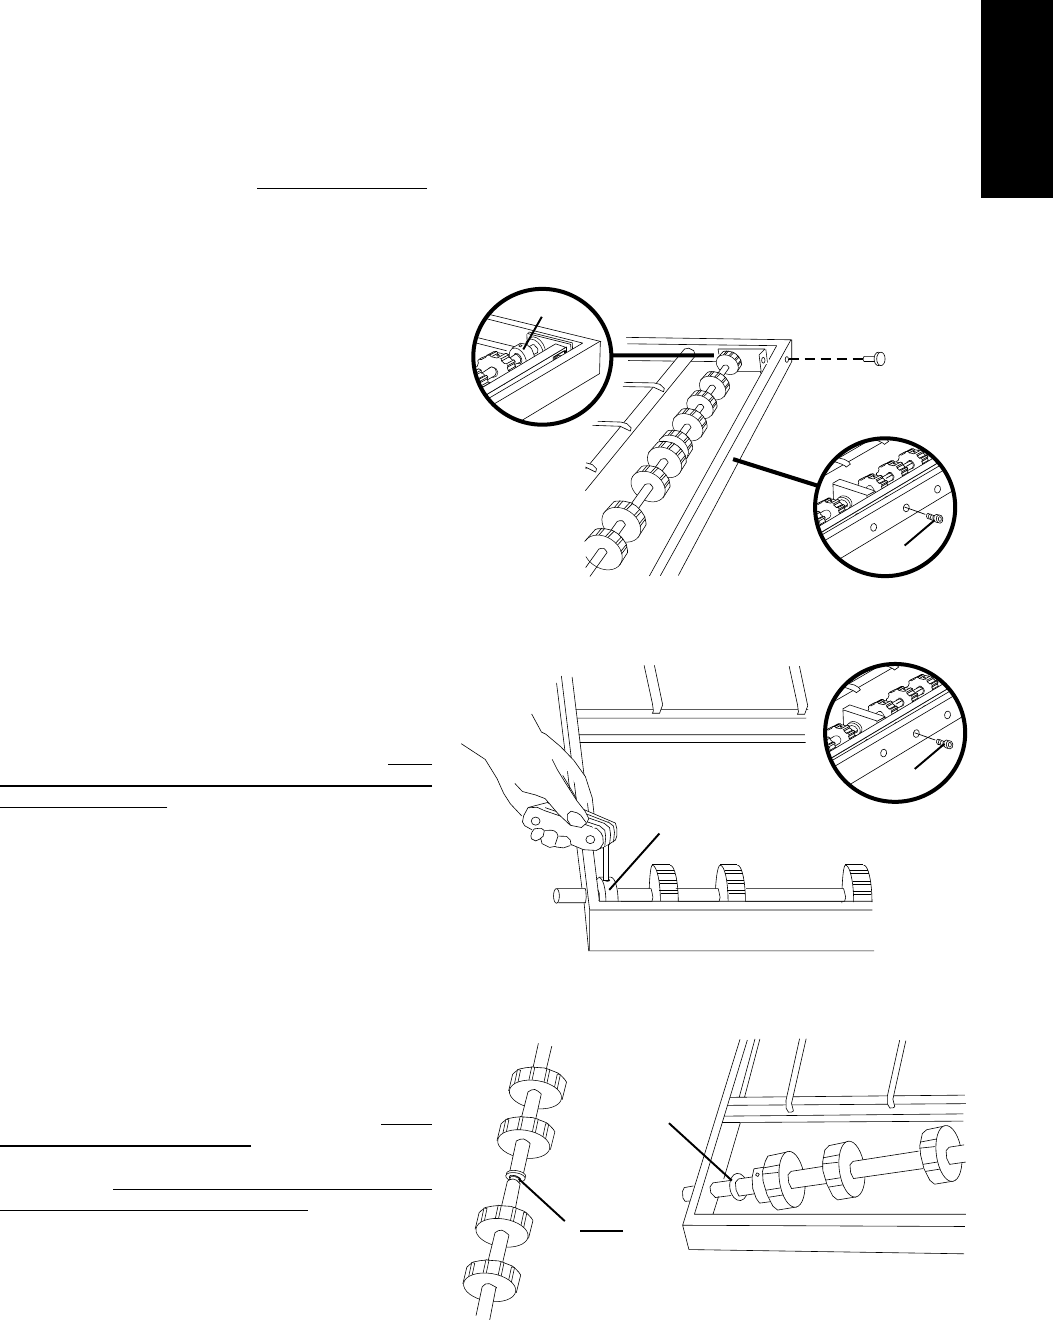
make
sure that the bronze washer is in place between the two
sections of the shaft. See Figure 4-8.
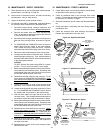
9. Loosen the set screw on both of the conveyor drive
sprockets. Then, remove the sprockets from the shaft.
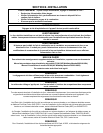
10. Loosen the locking collar set screw, as shown in Figure
4-7. For PS360EWB and PS360WB70 ovens, remove
the socket head screw shown in the inset drawing.
11. Push the drive shaft to the right, then lift it free of the
conveyor frame. Then, disassemble and lubricate the
two sections of the drive shaft as described in Step 5.
12. Before reassembling the shafts into the conveyor frame,
check that they are oriented properly. Remember that
unequal-width split belt ovens should ALWAYS have
the narrower belt at the front of the oven.
13. Reassemble the drive shaft into the conveyor. Check
that the nylon spacer is in place, as shown in Figure 4-
8. Also, for all ovens except the PS360EWB and
PS360WB70, check that the bronze washer is in place
between the two sections of the shaft.
14. Replace the drive sprockets. Reassemble the belts
and master links onto the conveyor, and replace the
conveyor in the oven.
15. Reassemble the motor shroud and conveyor exten-
sions onto the oven.
SECTION 4 - MAINTENANCE
IV. MAINTENANCE - EVERY 6 MONTHS
A. Check that the oven is cool and the power is disconnected,
as described in the warning on Page 20.
B. Check for excessive wear on the conveyor drive motor
brushes. The brushes should be replaced if they have worn
to less than 1/4" (6.4mm) in length.
C. Clean and inspect the burner nozzle and electrode assem-
bly.
D. Check (and clean, if necessary) the oven venting system,
including the flue.
E. Check the conveyor drive shaft bushings and spacers.
Replace the components if they are worn.
Figure 4-6 - Split Belt Idler Shaft
Figure 4-7 - Split Belt Drive Shaft
Figure 4-8 - Washers and Spacer
All ovens
Conveyor adjustment
screw (2)
PS360EWB and
PS360WB70 Only
Collar
Screw
Screw
All ovens
Locking collar
All ovens
except
PS360EWB and
PS360WB70
Bronze washer on
BOTH idler and
drive shafts
All ovens
Nylon spacer
on drive shaft
ONLY
PS360EWB
and
PS360WB70
Only
PS360EWB and
PS360WB70 Only