


UK Helpline 0844 871 0944 Replacement Parts 0844 873 0710 Ireland Helpline 1800 409 119
8
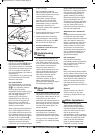
Filling the Fruit and
Nut Dispenser*
• If you have selected a recipe that
uses the fruit and nut dispenser,
you should fill it now. The dispenser
should be filled with one cupful of
dry ingredients using the
measuring cup provided. Please
ensure that you do not overfill the
dispenser as this may stop it from
functioning.
• If filling the dispenser with fruit,
check that the fruit is separated
before adding it. Failure to do so
may result in the dispenser not
functioning, or the fruit not being
distributed evenly through the
bread mixture. Ideally, fruit should
be dusted with flour prior to being
added to the dispenser to stop it
from sticking together.
* Only applies to model 48323.
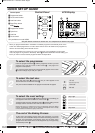
Using the Timer
• Once you have chosen the
programme, loaf size and crust
setting, you can either bake the loaf
immediately or delay the loaf
baking time to end in up to 12
hours time. Go to ‘Baking The Loaf’
section to bake the loaf
immediately.
• NOTE: The timer cannot be used
with the Fastbake, dough and jam
programmes.
• NOTE: Do not use this function
with recipes that use perishable
ingredients such as eggs, fresh
milk, sour cream or cheese.
• Press the ‘+’ or ‘-’ buttons  to
delay the finish time of your loaf.
A single press of the ‘+’ will add 10
minutes to the time or press and
hold the ‘+’ button to scroll faster
through the time. The ‘-’ button
only becomes active once the ‘+’
has been pressed.
• Symbol Î shows on the screen as
the cycle time updates. The total
time shown on the screen will
include the baking time and delay.
For example, if a loaf takes 3 hours
to bake and you have delayed the
start of baking for 5 hours, the
screen will countdown from 8
hours with symbol Î showing on
the screen. When the baking starts,
the Î symbol will disappear as the
delay has finished.
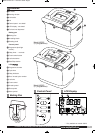
Baking the Loaf
• To bake the loaf press the
Start/Stop button Ë and the
breadmaker will start baking the
loaf.
• During the baking process several
other icons will appear on the
screen, which denote which stage
of baking the programme is
currently at.
• The numbers indicated by Ï relate
to the 1st, 2nd or 3rd ‘Knead’ and
‘Rise’ stage. Every loaf follows the
same process of 1st knead, 1st
rise, 2nd knead, 2nd rise, and
finally a 3rd rise.
• Ô is the symbol which shows on
the LCD display for ‘kneading’ and
is the symbol which shows on
the LCD for ‘rising’. The numbers
‘1’, ‘2’ or ‘3’ Ï show accordingly.
• When the loaf has finished baking
the breadmaker will beep for 3
seconds and the breadmaker
automatically goes into ‘Keep
warm’ mode (Ò flashes) for 60
minutes. These minutes are
counted up on the display.
• The Start/Stop button Ë can be
pressed at any time during the
keep warm function to stop it so
the bread can be removed.
Beeper
The beeper sounds:
• When pressing any button
• During the second kneading cycle
of certain programmes to indicate
that cereals, fruit, nuts or other
ingredients can be added. (On
48323 the fruits and nuts are
added automatically.)
• When the programme finishes.
• When keep warm finishes.
Power Interruption
After a brief power supply failure:
• If the programme has not yet
reached rise 1, press Start/Stop Ë
and the programme will continue
using the automatic repeat
function.
• If it has gone beyond this point, the
process must be started from the
very beginning. The ingredients will
have to be discarded and you must
start again with fresh ingredients.
Slicing and Storing
Bread
For best results place bread on a
wire rack and allow to cool for 15-
30 minutes before slicing.
Use an electric knife or a sharp
knife with a serrated blade for even
slices.
Store unused bread tightly covered
in a plastic bag at room
temperature for up to three days. If
weather is hot and humid, store in
the refrigerator overnight.
For longer storage (up to one
month), place bread in a tightly
covered container in the freezer.
If you store the bread in the
refrigerator, leave it out to bring it
to room temperature before
serving.
Since homemade bread has no
preservatives it tends to dry out
and become stale faster than
commercially made bread.
Leftover slightly hardened bread
may be cut into 1.3 cm (half inch)
or 2.5cm (1 inch) cubes and used
in favourite recipes to make
croutons, bread pudding, or
stuffing.
Care and Cleaning
1 Caution: To prevent electrical
shock, unplug the unit before
cleaning.
2 Wait until the breadmaker has
cooled.
• IMPORTANT: Do not immerse or
splash either the body or lid in any
liquid as this may cause damage
and/or electric shock.
48322 a4:45xxx rev1 11/01/2010 09:26 Page 8