


5
For details of other Morphy Richards products, please see our website:
4 Dough (1:30)
This setting only makes the dough
and will not bake the final bread.
Remove the dough and shape it to
make bread rolls, pizza, etc. Any
dough can be prepared on this
setting. Do not exceed 500g (1lb) of
combined ingredients.
5 Bake (0:30)
This setting is only used after
programs 1,2 or 3 if you require a
longer bake time. Do not use after
the dough setting.
Using Your
Breadmaker
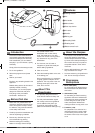
1 Take out the pan
Open the lid and remove the pan by
lifting the handle, turning anti-
clockwise and lifting out. Place on
the work surface. It is important that
the pan is filled with ingredients
outside the machine so that any
accidental spillage is not ignited by
the heating elements.
2 Attach the blade
Attach the kneading blade to the
shaft by pushing on.
3 Measure ingredients
Measure the ingredients required and
add them all into the pan in the order
listed. See later section (‘Measuring
your ingredients’).
• When adding the yeast to the baking
pan, take care that the yeast does
not come into contact with the water
or any other liquid, as it will start to
activate immediately.
• Use tepid water 21-28
o
C.
4 Put pan back in
Place the baking pan back in the
breadmaker, turning clockwise to
lock into place. Close the lid.
5 Plug in
Plug into the power supply.
6 Select programme
Choose the desired setting by
pressing the Menu button
›
until
the setting you require is highlighted
by the indicator light.
7 Start
Press the Start Stop button
fi
to
start the machine.
8 Progress
The breadmaker will automatically
proceed through the programmed
stages.
• Fruits and nuts can be added to the
mix for certain recipes, these should
be added when the add ingredients
beep is heard. See recipes for times.
• It is possible that steam will escape
through the vents during baking, this
is normal.
9 Finish
When the programme is completed
and the bread is baked, the beeper
will sound.
10 Keep warm
The keep warm function will circulate
hot air for a further 60 minutes on
most settings (see ‘Baking cycle
times’ section). For best results,
remove the baking pan and loaf
within this period or when the initial
programme is completed. A beep will
be heard when the keep warm period
is finished.
11 Remove the food
Press Stop. Open the lid.
WARNING: Use oven gloves when
removing the baking pan and take
care as it is very hot.
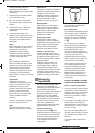
12 Turn out the bread
Allow the bread to cool in the pan for
15 minutes, then turn the pan upside
down and tap the bread from the pan
onto a rack to cool. Fill the pan with
warm water immediately to prevent
the blade from sticking to the shaft.
• Occasionally the kneading blade will
stay in the loaf. Wait until the loaf is
cool and then remove the blade with
the metal utensil provided.
13 Always unplug the appliance after
use.
• Do not open the lid whilst the
breadmaker is operating as this will
affect the quality of the bread,
especially it’s ability to rise properly.
Only open the lid when the recipe
needs you to add additional
ingredients, (see recipes).
Room temperature note
The breadmaker will work well in a
wide range of temperatures, but
there could be a difference in loaf
size between a very warm room and
a very cold room. We recommend the
room temperature should be
between 15
o
C and 34
o
C.
Beeper
The beeper sounds:
• when pressing any button;
• during the second kneading cycle of
certain programmes to indicate that
cereals, fruit, nuts or other
ingredients can be added;
37 minutes for the basic setting.
44 minutes for the wholewheat
setting.
• when the programme finishes;
• when keep warm finishes.
Slicing and storing
bread
For best results, place bread on a
wire rack and allow to cool for 15-30
minutes before slicing.
Use an electric knife or a sharp knife
with a serrated blade for even slices.
Store unused bread tightly covered in
a plastic bag at room temperature for
up to three days. If weather is hot
and humid, store in the refrigerator
overnight.
For longer storage (up to one month),
place bread in a tightly covered
container in the freezer.
If you store the bread in the
refrigerator, leave it out to bring it to
room temperature before serving.
Since homemade bread has no
preservatives, it tends to dry out and
become stale faster than
commercially made bread.
Leftover slightly hardened bread may
be cut into 1.3 cm (half inch) or
2.5cm (1 inch) cubes and used in
favourite recipes to make croutons,
bread pudding, or stuffing.
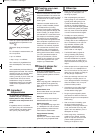
Care and cleaning
1
WARNING: To prevent electrical
shock, unplug the unit before
cleaning.
2
Wait until the breadmaker has
cooled.
• IMPORTANT: Do not immerse or
splash either the body or lid in any
liquid as this may cause damage
and/or electric shock.
48330 rev2_x 24/06/2010 11:58 Page 5