


To unlock the blades (D) from the
spindle (C):
• Place the bowl assembly on a stable
flat worktop.
• Carefully lift the blade (D) off the
spindle (C).
Usage and practical tips
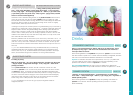
Blending
• Turn the speed selector (A5) to
position “2” to start the appliance.
You can blend up to 1 litre of soup or
stewed fruit in 20 sec.
Chopping
• Turn the speed selector (A5) to
position “2” to start the appliance or,
for better control over the chopping,
use the “pulse” position.
• In 15 to 30 sec., you can chop up to
600g of food:
• hard produce: cheese, dried fruits,
certain vegetables (carrots, celery...).
• soft produce: certain vegetables
(onions, spinach...).
• raw or cooked meat (boned with
gristle removed and diced).
• raw or cooked fish...
KNEADING/MIXING
• Turn the speed selector (A5) to
position “2” to start the appliance.
• When kneading, stop the appliance
as soon as the pastry/dough starts to
form a ball.
You can:
• knead up to 1.2 kg of pastry/dough
(biscuit, shortcrust, and bread) in
approximately 60 sec.
• mix up to 1 litre of pancake, waffle
batter, etc. in 1min to 1
1
/2 min.
• mix up to 1.5 kg of light cake
mixture (biscuit, sponge) in 1
1
/2 min
to 3
1
/2 min.
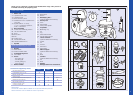
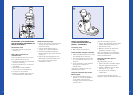
MIXING/BLENDING/CHOPPING/
KNEADING - (DIAGRAM 2)
Accessories used (depending
on model)
• Bowl assembly (B), spindle (C) and
blades (D):
• Metal blade (D1) for mixing or chopping.
• Plastic kneading blade (D2) for kneading
or blending, pastry and cake making
Fitting the Bowl
Press the release button (A4) to open
the Liquidiser drive cover (A1).
• Fit the bowl (B3) on the Bowl
accessory drive (A3).
• Fit the spindle (C) on to the
bowl drive (B3a).
• Slide the metal blade (D1) or the
plastic kneading blade (D2) onto the
spindle (C), pushing it down to the
bottom of the bowl.
• Put the ingredients in the bowl.
• Fit the lid (B2) on the bowl.
• Close the Liquidiser drive cover (A1).
You should hear an audible click.
Note: If the lid and handle are not
correctly fitted on to the bowl, the
appliance will not start.
2
2
1
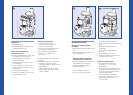
FUNCTIONS OF YOUR FOOD PROCESSOR
Fitting/Dismantling the bowl
handle (B4) and the liquidiser jug
handle (
I4)
For ease of cleaning and storage, the
bowl handle (B4) and liquidiser jug
handle (
I4) are detachable.
• To fit the handle, position it against
the lugs of the bowl/jug.
• Slide the handle upwards until
it clicks.
• To detach the handle, press the
release button (B4a) or (
I4a) and slide
the handle downwards.
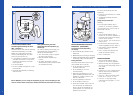
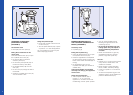
FITTING DETACHABLE PARTS
Assembling/Dismantling the bowl
(B3) - (diagram 1)
The bowl can be used with the following
accessories (depending on model):
Blades (D), grating/slicing discs (E),
whisk (F), emulsifying disc (G), citrus
press (H), juice extractor (J).
• If not already in position, fit the rubber
seal (B3c) in the bottom of the bowl.
Ensure that the thin lip of the seal
faces upwards.
• Fit the drive (B3a).
• Fit the nut (B3b) and tighten it to lock
the assembly.
• Dismantle the assembly for cleaning
after each use.
(Note: Whether you are using the Liquidiser jug (l3) or the bowl (B3) you will
need to ensure that the respective handle and lid have been fitted correctly.)
ASSEMBLING AND DISMANTLING THE BOWL
1
65
B3b
B3a
B4a
B3c