


ENGLISH
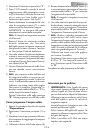
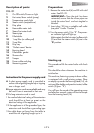
Description of parts:
FIG. 01
1 On-Off-switch/Power-on light
2 Hot water/brew switch (pump)
3 Temperature ready-light
4 Steam switch (temperature)
5 Drip plate
6 Removable water tank
7 Steam/hot water knob
8 Steam pipe
9 Filterholder
10 1 cup filter (or coffee pod)
11 2 cup filter
12 Drip tray
13 Perfect crema device
14 Brewing head
15 Filterholder gasket
16 Shower disc
17 Tamper
18 Power cable and plug
19 Measuring spoon
Instructions for the power supply cord
A A short power-supply cord is provided to
reduce risks of getting tangled up or tripping
over a longer cord.
B Longer extension cords are available and may
be used if care is exercised in their use.
C If a long extension cord is used:
1 the marked electrical rating of the extension
cord should be at least as great as the
electrical rating of the appliance.
2 if the appliance is of the grounded type, the
extension cord should be a grounding type
3 the cable does not hang from the table to
avoid the risk of getting caught up in it.
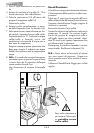
Preparation:
1. Remove the water tank (6) and fill with cold
water. See FIG. 02.
IMPORTANT: Once the tank has been
reinserted, ensure that the silicon pipes are
inside the actual tank and not tangled or
blocked.
2. Insert plug (18) into a suitable wall outlet
(see point 1 under Caution).
3. Turn the power switch (1) to 1. The power-
on indicator light will light up.
Make certain that the hot water/coffee switch
(2) and that the steam switch (4) are in the
0 position.
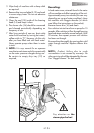
Starting up
This procedure fills the water boiler with fresh
water.
This should be done whenever the machine is
switched on.
This machine, featuring a pump to brew coffee,
is equipped with a self-priming system. Place
an empty cup under the brewing head (14), do
not insert filter holder and press hot water/coffee
switch (2) (pos. 1).
You will hear the sound of the operating pump
and after few seconds, water will start to escape
from the brewing head (14).
9