7
6
Use the bottom of the scoop to slightly press the grounds down after placing them in the
filter cup (G). This will help you brew hot, rich, delicious espresso with perfect crema
(the golden layer on top of fresh-brewed espresso).
B
EFORE
U
SING FOR THE
F
IRST
T
IME
Refer to Page 4 for the Diagram of Parts.
1. Wash all removable parts with hot water and a mild detergent and rinse thoroughly.
2. Remove the pink cap from the end of the hose inside the reservoir.
3. Fill the Water Reservoir with water. Do not exceed MAX fill line.
4. Follow the steps on Page 6 for brewing espresso to rinse the inside of the machine.
Use water only. Do not use coffee for the cleaning cycle.
5. Follow the Steps on Page 7 for steaming milk to clean the Frothing Arm.
You should use water
instead of milk for this cleaning process.
6. After you have brewed one cycle and steamed for approximately 45 seconds,
empty the water reservoir, remove, rinse and dry all parts.
C
AUTION
:
Allow unit to cool before removing parts.
Y
OUR
E
SPRESSO
M
AKER
I
S
N
OW
R
EADY
T
O
B
REW
G
REAT
E
SPRESSO AND
C
APPUCCINO
!
B
REWING
E
SPRESSO
1. Make sure the On/Off switch (see Diagram on Page 4) is in the OFF position
and the brew and steam switches are off.
2. Plug in your new MR. COFFEE
®
Espresso and Cappuccino Maker.
3. Remove the water reservoir and fill with fresh, cold water. Be sure to keep the water
reservoir filled above the “min” water level marking printed on the reservoir.
4. Replace the water reservoir into the machine, making sure that it slides completely into
place. When inserted properly, the end of the water reservoir will be even with the base.
Make sure the end of the hose is down in the water.
5. Turn the On/Off Switch to the “On” position so that the On Light is illuminated.
6. While the water is heating, insert filter in filter holder.
7. Put grounds into filter cup using 1 scoop for one 2-ounce serving and 2 scoops
for two 2-ounce servings, or place a standard 7g/45mm espresso coffee pod in the pod
adapter.
8. Use the bottom of the scoop to press the coffee grounds so that they are flattened down
and smoothed over. Gently remove any excess grounds from the rim of the filter holder.
If using a coffee pod, do not tamp it down.
9. Insert the filter holder into the machine. Make sure the thumb guard is flipped back and
not resting on top of the filter. Insert filter holder approximately 45 degrees to the left,
using the line on the Brew Head as a guide. When properly aligned, slide the filter
handle to the right until the handle is in the locked position. The handle will be
in the “Lock” area and should feel snug. YOU DO NOT NEED TO OVERTIGHTEN.
10. Place a cup underneath the filter holder spouts. Espresso will brew out of both filter
spouts, so use a cup that is wide enough to catch liquid from both spouts or brew
into two cups placed right next to each other.
11. When the Brew Ready Indicator Light comes on, you may begin brewing espresso.
(Your machine will only take a few minutes to heat up enough water for brewing).
Press brew button on (brew position). Brew for approximately 25-30 seconds.
You may adjust brewing time to taste. A shorter brew time will yield a stronger cup of
espresso. The brew ready indicator light may go out while you are still brewing. This
just means that the machine is heating more water.
12. After 25-30 seconds, press brew button to turn off pump.
13. Remove cup from drip tray. Use caution when removing the filter holder as there can
still be hot water in the filter. Flip the thumb guard over the filter and knock out the
used grounds or spent coffee pod. Use caution as the filter and filter holder are very
hot. Rinse out the filter and filter holder and dry all parts.
14. You can brew multiple cups of espresso one right after the other! Just make sure the
water reservoir stays filled above the “min” level marking. Repeat Steps 5 – 13 above
to brew multiple cups of espresso.
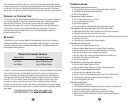
U
SING
E
SPRESSO
P
ODS
Your new MR. COFFEE
®
ECMP40 Espresso and
Cappuccino Maker has been designed to be pod-
adaptable, that is, you may use versatile, pre-packed,
standard single shot 7g/45mm espresso coffee pods
instead of regular espresso grounds coffee to brew your espresso. Pods contain a pre-
measured amount of espresso grounds packed in tear-resistant filter paper, with the added
convenience of no-fuss handling and mess-free disposal.
To prepare espresso using espresso pods, just replace the regular filter basket inside the
filter holder with the included pod adapter, then brew your espresso as explained in the
appropriate section of this instruction manual, except that instead of putting grounds in the
filter cup, you will place an espresso pod with your favorite espresso type or blend in the pod
adapter, then insert the filter holder into the machine. Make sure that the small tab on the pod
border remains inside the adapter before you insert the filter holder, for the best seal.
H
OW
T
O
M
AKE
C
APPUCCINO
Cappuccino is espresso topped with steamed and frothed milk. Frothing milk for cappuccino
takes practice. Do not be discouraged if it is not perfect the first time. The milk should be
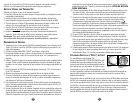
half steamed (bottom of pitcher) and half frothed (top of the pitcher). It may take a few
Pod
Pod Adapter