


5
O
PERATIONAND
U
SE
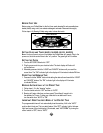
BEFORE FIRST USE
Before using your Coffee Maker for the first time, wash decanter/lid and removable brew
basket (black) using a mild, non-abrasive detergent and water. Rinse each thoroughly.
Follow steps 4-6 (Brewing Coffee) using water, to clean the inside.
S
ETTING CLOCK AND TIMER (NLX20, NLX20D, NLX23, NLX23D)
N
OTE: You do not have to set your clock before the Coffee Maker will operate. Plug in the
power cord, slide the control lever to the “on” position. The green light will illuminate.
S
ETTING THE CLOCK
1. Turn the AUTO/OFF/ON switch to “OFF.”
2. Plug the power cord into your electrical outlet. The clock display will flash until
you set the time.
3. Alternately press and hold the “HOUR” and “MINUTE” buttons until you reach the
current time. The “PM” indicator light in the display will illuminate to indicate PM time.
P
RESETTING THE BREWING TIME
1. Press and hold the “BREW” button while setting the desired brew time with the “HOUR”
and “MINUTE” buttons. The “PM” indicator light in the display will illuminate
to indicate PM time.
BREWING AUTOMATICALLY AT THE PRESET TIME
1. Follow steps 1-5 in the “brewing” section.
2. Turn the control switch to “OFF” and then to “AUTO.”
3. Brewing will begin at the time you have preset. The coffee will remain hot in
the decanter for 2 hours. To keep your coffee hot for an additional 2 hours,
turn the switch from “AUTO” to “ON”.
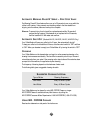
IMPORTANT: RESETTING AUTO BREW AT THE PRE-SET TIME
The programmable timer will not automatically brew the next day if left in the “AUTO”
position after its last use. This is a safety feature. If the “OFF” indicator light in the lower
right hand corner of the clock display is illuminated, reset “AUTO BREW” by turning the
control switch to “OFF”, then to “AUTO.”
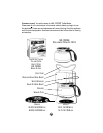
CLOCK DISPLAY
PM OFF
HOUR MINUTE AUTO/OFF INDICATOR BREW
SET SET ON SWITCH LIGHT BUTTON