031666-011 Rev B Page 5 of 11
b)
To Remove the Reservoir Lid: it is easiest
to push down slightly near the lid center and
lift on each tab at the front of the lid
individually. Once those have loosened, lift
up on each of the other two corners so the
lid lifts as straight up as possible. This will
help avoid the sealing edge from catching as
the lid is removed.
c)
Drain the water from the reservoir by
opening the cook and/or cold faucet.
d)
Grasp the reservoir using the handholds on
top and pull upward. Some resistance is
normal because of the tight fit required at the
sleeve-on-probe.
e)
Slide the newly sanitized reservoir into place
taking care not to touch the inside of the
reservoir with bare hands.
f)
Replace the reservoir lid and the cooler top.
4) Periodic replacement of the air filter assembly is
required to prevent airborne contaminants from
entering the reservoir. When the water filters
are changed and reservoir is sanitized, it is
recommended that the air filter also be replaced.
5) Periodic cleaning of the strainer inside the tube
at the elbow on the mechanical float is required
to maintain water flow. It can be removed from
the tube for cleaning or flush water in reverse
flow through the strainer. It is recommended
that this be done at least as often as the filters
are changed.
C)
Hot Tank Cleaning Instructions
Water coolers need to be cleaned periodically to
prevent mineral buildup inside the heating tank. The
frequency of cleaning is determined by the quantity
of minerals in the water and the amount of water
used.
Hot tanks may require cleaning when:
1)
Normal hot water flow appears restricted.
2)
Noisy heating cycles are heard.
3)
Water in the cooling tank is very warm.
4)
Mineral build-up has imparted a taste to the
water.
PLEASE READ AND FOLLOW ALL DIRECTIONS TO
PREVENT DAMAGE TO THE UNIT AND TO THE
USER.
CAUTION:
Because this cleaning process involves very
hot water that may scald, the use of rubber gloves is
recommended.
KEEP CHILDREN AWAY
.
MATERIALS YOU WILL NEED:
1)
Four (4) ounces (113grams) of citric acid
crystals. Critic acid crystals are available in four-
ounce and fifty-pound quantities from the
address at the end of this manual.
2)
A pair of rubber gloves.
3)
A bucket or pan with a two (2) gallon (7.5 liters)
capacity.
4)
A funnel with a 3/8” (10mm) max diameter at the
end.
5)
A quart (1 liter) measuring container for hot
liquids.
HOT TANK CLEANING PROCEDURE
1)
Unplug the service cord and turn off water
supply.
2)
Draw water from the hot faucet until the water is
cool.
3)
Remove the top and set aside the reservoir lid.
4)
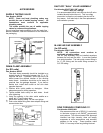
Place a container under the hot tank drain valve.
For convenience, insert a 3/8” (10mm) OD
plastic tube into the opening at the end of the
black valve and turn the petcock
counterclockwise or simply turn the valve’s
petcock counterclockwise without the tube into
the drain. Drain tank.
5)
Drain an additional amount of water from the
reservoir through the faucet to further expose the
hot tank inlet tube opening.
6)
Close hot tank drain valve.
7)
Mix four (4) ounces (113 grams) of citric acid
crystals with one (1) quart (1 liter) of very hot
water. (Wearing rubber gloves is
recommended).
8)
Place a funnel inside the reservoir in the left-
hand tube (in line with the hot faucet). Carefully
pour the hot solution into the funnel.
BE
CAREFUL NOT TO SCALD YOUR HANDS.
9)
Remove the funnel and fill the reservoir with two
(2) gallons (7.5 liters) of water. Open the hot
faucet to allow the hot tank to fill.
10)
Place the reservoir lid on top of the reservoir.
11)
Plug the service cord into the grounded fused
outlet.
12)
Let the unit stand for at least twenty (20)
minutes.
13)
Unplug the service cord.
14)
TURN OFF THE HOT TANK SWITCH FOUND
ON THE COLUMN SUPPORT BEHIND THE
ACCESS DOOR.
15)
Remove reservoir lid as before.
16)
Draw water from the hot faucet until the water is
no longer warm.
17)
Open the hot tank drain valve and catch the
water in a pan or bucket. The water will be
discolored.
NOTE: THIS DRAIN WATER
SHOULD BE IMMEDIATELY POURED DOWN
A DRAIN TO PREVENT ACCIDENTAL
SPILLING. THIS WATER WILL STAIN.
18)
If sanitizing is required, see the WATER
COOLER SET-UP AND PREPARATION
INSTRUCTIONS in this manual. This is also a
good time to sanitize the reservoir as outlined in
the reservoir flushing procedure located in the
filter “Installation & Service Guide”.
19)
Pour at least two (2) gallons (7.5 liters) of water
into the reservoir and allow this water to drain
out the hot tank drain.
20)
Close drain valve and replace lid making sure it
snaps completely into place.
CAUTION:
FAILURE TO TURN OFF HOT TANK COULD
CAUSE PHYSICAL DAMAGE TO THIS UNIT.


