


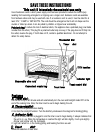


E.
Toast lever:
Controls the toasting function and automatically turns the oven off when
toasting
is completed,
F
Non stick interior
walls
and ceiling:
Allows
for
easy cleaning.
G. Removable wire rack:
The removable wire rack has 4 different settings. Place the rack
in
an upside-down
‘U’
position
closest to the top heating elements for broiling or
melting toppings
NOTE.
If you are cooking will, a
heavy dish,
we
suggest
the upside-
down
‘U’ position
to increase
the
rack’s
rigidity
H.
Side handles:
For ease
0f
transportion.
I.
Convenient crumb tray:
For crumb or waste collection. Pulls down for easy
cleaning.
Pull knob on bottom ot unit towards
back of unit to release tabs. Pull down to open To close, align tabs and push front on knob.
J.
Cord
storage
bracket
Wraps the cord
for
convenient storage and ensures that the oven IS not pushed too close to the wall
K.
Heavy
duty
baking pan and broiling/grilling tray:
Use
for
all your baking,
broilinq and
grilling needs.
Cleaning
the Toaster Oven
Before
cleaning your Oster deluxe toaster oven,. unplug it and allow it to cool To clean, wipe
manually
with a soft cloth. 00 not immerse in water! Make sure to use only mild soapy water. Benzene,
cleaners, scrubbing brushes and chemical cleaners wilt damage the non-stick coating
on this unit
Before
re-using
the unit, make sure
It
is completely dry
Storage and Maintenance
Allow the appliance
to cool
completely before storing. Store the toaster oven in a dry location such as
on a table or counter top, or in a cupboard shelf. Wind the electrical cord and
secure
with a twist
fastener. Other than the recommended
cleaning
, no further user maintenance should
be
necessary.
Return the toaster oven to our Bay Springs,
MS
, Service Center for servicing or-repairs. (See
last
page for shipping address.)
Using Your Oster Toaster Oven
Caution:
Never place anything on top of your Toaster Oven as it can gel very hot.
How to Bake/ Defrost
1. Place the wire rack in the desired position.
2. Select the required temperature. (Use the settings between ‘Warm’ and for delrosting.
Vary temperature based on size and type of food.)
3. To switch the oven ‘on’, turn the timer dial to the desired time. For best results, allow the oven to
preheat for 4-5 minutes before using.
Note:
If
the
oven door is opened beyond the first
notch
(approx.
1.4 inches), the
unit
will shut off.
If
there
is
still
lime remaining on
the
timer
it
will
resume
baking/defrosting
when
the
door is
shut.