


76
MINI-BLEND® JARS
MINI-BLEND
®
Jars, 8-ounce (250 ml) or 30-ounce (950 ml), are available as accessories and are not
normally included with your Blender. For proper assembly and tightening instructions, see directions
above and on previous page. The
MINI
-BLEND
®
Jars allow for the processing and storing of foods
in the same container.
DO NOT USE OTHER TYPES OF JARS FOR PROCESSING FOODS. Ordinary jars may break
or unscrew during processing. Do not wash any parts, including container, in an automatic
dishwasher. DO NOT fill
MINI
-BLEND
®
Jar above MAXIMUM FILL LINE to allow for expansion
of foods while processing. Overfilling may cause the jar to break and could result in injury.
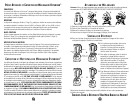
OSTER® MINCER
The
O
STER
®
M
INCER
is available as a stand-alone accessory and packaged with an
O
STER
®
Blender (Model 6646 Only).
The Mincer is designed to mince virtually all foods.
H
OW TO
U
SE
Remove Blender Jar and place
MINCER
onto motor base of Blender. Make sure that the
O
STER
®
logo faces front, and that the holes under the base match the Blender spikes.
Remove cover by pushing it down and rotating it counterclockwise. Insert the blade, and put
the ingredients to be minced into the container of your
O
STER
®
M
INCER
. Replace the cover
by pushing it down and rotating it clockwise, making sure that the three locks are correctly
secured and that the
O
STER
®
logo is in front. For safe
operation while using your Blender,
press down on the cover of the
OSTER
®
MINCER
during operation.
After using your
O
STER
®
M
INCER
, remove parts and wash each in water.
Dry immediately or let air dry.
HOW YOUR OSTERIZER® BLENDER WORKS
Your
O
STERIZER
®
B
LENDER
is a multi-speed appliance which operates on a wide range of speeds
from very slow to very fast. This range of speeds makes food preparation easy, interesting
and also saves time because your
O
STERIZER
®
B
LENDER
processes foods in seconds.
In addition, your
O
STERIZER
®
B
LENDER
has two distinct methods of operation:
1 – CONTINUOUS run for blending, liquefying and fine chopping and
2 – CONTROLLED CYCLE BLENDING, used for coarse chopping pieces of food,
such as chopped vegetables, nuts or cheeses. There are several different ways of operating the
CONTROLLED CYCLE BLENDING feature but all involve turning the motor “ON” and “OFF”
intermittently. During the “ON” portion of the cycle, food is chopped and tossed away from
the blades. During the “OFF” portion of the cycle, the food is distributed around the blades to make
processing more uniform. IN THIS BOOK, THE CONTROLLED CYCLE BLENDING FEATURE
IS REFERRED TO AS A CYCLE.
NOTE:
A cycle consists of operating the Blender for about 2 seconds and then
allowing the blade to coast to a stop.
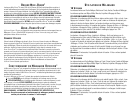
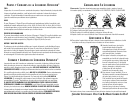
HOW TO USE YOUR BLENDER
10-S
PEED
Low speeds are Easy Clean, Purée, Chop, Whip and Mix.
High speeds are Grate, Blend, Grind, Liquefy and Ice Crush.
FOR CONTINUOUS OPERATION
Determine whether you want to use “High” or “Low” continuous cycling. Push the “High”
or “Low” button, rest hand on top of container and then push desired “speed” button.
All speed buttons are continuous speed buttons except for Ice, Crush and Mix,
which are controlled cycle buttons (labeled “pulse”). Press “Off” to turn Blender off.
FOR CONTROLLED CYCLE OPERATIONS
The “Ice Crush” (high) and the “Mix” (low) buttons are controlled cycle operations.
To use, determine whether you want to use “High” or “Low” controlled cycle operation.
Press “High” or “Low” button accordingly. Rest hand on top of container and then push
button labeled “Ice Crush” (high)/“Mix” (low)/“Pulse”. Hold button down for about
2 seconds, then release and allow blades to coast to a stop. Repeat cycles until contents
reach desired consistency. Release of “Pulse” button turns the Blender off.
N
OTE
:
Pulse button can be held for longer than 2 seconds as needed.
12-SPEED
Low speeds are Easy Clean, Purée, Cream, Chop, Whip, and Mix.
High speeds are Grate, Blend, Shred, Grind, Liquefy, and Ice Crush.
FOR CONTINUOUS OPERATION
Determine whether you want to use “High” or “Low” continuous cycling. Slide the
“High” or “Low” switch to “High” or “Low”, rest hand on top of container and then
push desired “speed” button. Press “Off” to turn Blender off.
FOR CONTROLLED CYCLE OPERATIONS
Determine whether you want to use “High” or “Low” controlled cycle operation.
Slide the “High” or “Low” switch to “High” or “Low”. Rest hand on top of container
and push “Pulse” button. Hold button down for about 2 seconds, then release and
allow the blades to coast to a stop. Repeat cycles specified in recipe. Release of
“Pulse” button turns the Blender off.
N
OTE
:
Pulse button can be held for longer than 2 seconds as needed.
TO PROCESS FOOD
• Assemble container (See Page 5, Assembling Your Blender).
• Put ingredients into Blender container, cover firmly, and place container into ring
on motor base. (See Page 5, Tightening the Container.)