


4
5
us I n g Yo u r Bl e n d e r
Clean blender according to the instructions in the “Cleaning and Storing
YourBlender”section.
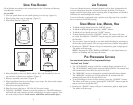
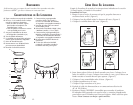
Jar assembly:
1. Turn jar upside down so the small opening is at the top. (Figure 1)
2. Place sealing ring over jar opening. (Figure 1)
3. Place blade into jar. (Figure 2)
Figure 1 Figure 2
Figure 3
Figure 4
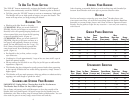
Ja r Fe a t u r e s
Yournewblenderfeaturesauniquelyshapedovaljarthatisdesignedtofit
inmostrefrigeratordoorsforconvenientstorageofdrinks.Thisnewjar
design creates a figure eight vortex ensuring that all ingredients are blended
efficientlyforoutstandingdrinkresults.
Yournewblenderisequippedwithapitcher-style,flip-toplidsoyoudon’t
have to remove the lid for pouring.
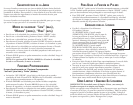
sP e e d mo d e s : lo w , me d I u m , HI g H
• ToblendinHighSpeed,pressthe“HIGH”button.
• ToblendinMediumSpeed,pressthe“MED”button.
• ToblendinLowSpeed,pressthe“LOW”button.
• ToStopblending,pressthe“ON/OFF”button.Themotorwillcome
toastop.(Pressingthe“ON/OFF”buttonstopsthemotorandturnsoff
the blender.)
• Youcanmovebetweenspeedsatanytimewhileblendingbypressingany
of the other speed buttons. The new speed will start without interruption.
• Pressingthe“PULSE”Buttonwillgiveamomentarypulseathighspeed.
The motor will then stop.
NOTE:Pressingthe“ICECRUSHorDRINKS”ortheSpeedbuttonat
which it is blending will also stop the motor.
Pr e -Pr o g r a m m e d se t t I n g s
Your new blender features 2 Pre-Programmed Settings:
“Ice Crush” and “Drinks”.
• The“ICECRUSH”settingisidealforcrushinglargerquantitiesofice.
The“ICECRUSH”modepulsesbetweenhighandofffor30secondsand
will automatically shut off at the end of the cycle.
•The“DRINKS”settingisdesignedforperfectlyblendedfrozendrinks.
The“DRINKS”settingrunsonhighspeedfor45secondsandwill
automatically shut off at the end of the cycle.
• Tostopblendingineitherofthesesettings,pressthe“ON/OFF”button.
Themotorwillcometoastop.(pressingthe“ON/OFF”buttonstopsthe
motor and turns the blender off.)
• Pressingthe“PULSE”buttonwillgiveamomentarypulseathighspeed.
The motor will then stop.
4. Place threaded jar nut over blade and jar. Place the threaded jar nut on
jarandturnitclockwisetotighten.(Figure 3)
5. Place jar assembly onto base. (Figure 4)
6. Place ingredients into jar according to your recipe. For best results always
add liquids first when blending.
7. Place pour through lid on jar.
8. Plug the power cord into a 120 Volt AC electrical outlet.
9.Touchthe“POWER”buttontoturntheproducton.TheLEDIndicator
willflashred(andcontinuetoflash)indicatingitisreadytooperate.You
are now ready to blend. Avoid contact with blades and moveable parts.