


8. POWER Button – Turns the product On and Off.
9. PROGRESS Indicator – A segmented bar fills showing the status.
10. Touchpad Buttons – Use to select AUTOMATIC food and drink settings.
11. START/STOP Button – Use to Start and Stop the product.
12. High Button – Use to MANUALLY increase speed.
13. Pulse Button – Press and hold to Pulse, release the button to Stop.
14. Speed Indicator – Indicates MANUAL speed.
15. Pause/Resume Button – Use to Pause and Resume AUTOMATIC or MANUAL
function.
16. Low Button – Use to MANUALLY decrease speed.
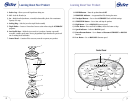
1. Feeder Cap – Allows you to add ingredients during use.
2. Lid – Seals the blender jar.
3. Jar – Made from Polycarbonate, a virtually indestructible plastic. Has a maximum
capacity of 6 cups.
4. Sealing Ring – Seals the jar to the triple blade assembly.
5. Triple Blades – Creates a forward and reverse action when using the AUTOMATIC
programs.
6. Low Profile Base – Holds the jar securely in 6 positions. Contains a powerful,
reversible, variable speed motor. It uses programmed logic that takes the guesswork
out of creating foods and drinks.
7. Control Panel – Contains all the necessary controls to operate your product.
Learning About Your Product
Learning About Your Product
3
2
PulsePause
Resume
Low High
FOOD DRINK
MANUAL
SPEEDS
START
STOP
POWER
PROGRESS
AUTO
FOOD
AUTO
DRINK
Smoothie
Frozen
Drink
Powder
Drink
Ice
Crush
Milk
Shake
Nuts/
Crumbs
Soup
Baby
Food
Salsa
Batter
8
9
10
11
12
13
14
15
16
Control Panel
PulsePause
Resume
Low High
FOOD DRINK
MANUAL
SPEEDS
START
STOP
POWER
PROGRESS
AUTO
FOOD
AUTO
DRINK
Smoothie
Frozen
Drink
Powder
Drink
Ice
Crush
Milk
Shake
Nuts/
Crumbs
Soup
Baby
Food
Salsa
Batter
1
2
3
4
6
5
7