


Preparing To Use Your Toaster Oven for the First Time
If you are using your toaster oven for the first time, please be sure to:
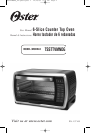
Remove any stickers from the surface of the oven.
Open oven door and remove all printed documents and paper from inside the toaster oven.
Clean the rack, tray, and pan with hot water, a small amount of dishwashing liquid
and a non-abrasive sponge or cleaning pad.
DO NOT IMMERSE THE BODY OF THE UNIT IN WATER.
Dry the unit thoroughly before using.
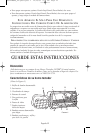
Select a location for the toaster oven. The location should be in an open area on a flat
counter where the plug will reach an outlet.
Plug the toaster oven into a 120 Volt AC electrical outlet.
The heating elements are designed to work efficiently and maintain a precise
temperature. You may not see the elements glowing, key are working properly.
Using Your Toaster Oven
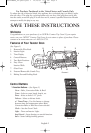
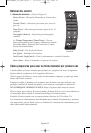
Setting the Clock
Press the Clock button. The clock will flash.
Use the timer
(-)
keys to set time. Press the Clock button again.
Use the
+
/
-
keys to set the minutes.
Push the Clock or Start button and the time will be set.
Preheating the Oven
Place oven rack into the desired position before heating the oven.
(See “Positioning Rack” Section)
Push bake button once.
Push the temperature
+
/
-
button to set desired temperature.
Push the Timer
+
/
- keys
until seven minutes is displayed.
Push the Start button.
To Use the Bake Function
Place oven rack into the desired position before heating the oven.
(See “Positioning Rack” Section)
Arrange food on the wire rack or in the baking pan.
Push the Bake button once. Push temperature
+
/
-
key to set desired temperature.
Push Timer
+
/
-
button. Use the
+
/
-
keys to select desired time.
Push the Start button.
Interior light turns on when timer is on. At the end of cooking cycle the light turns off
automatically.
NOTE – Both heating elements will cycle ON and OFF to maintain the desired temperature.
When baking is completed, open door fully and remove food carefully with oven mitt.
English-3
TSSTTVMNDG_IB.qxd:Layout 1 12/14/09 5:53 PM Page 5