3
INSTALLATION AND GROUNDING INSTRUCTIONS
Examine Your Oven
Unpack oven, remove all packing material and examine the oven for any damage such as dents, broken door latches
or cracks in the door. Notify dealer immediately if oven is damaged. DO NOT install if oven is damaged.
Installation
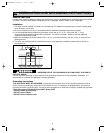
1. This oven must be installed in at least a 30 inch opening, it is suitable for use above gas or electric cooking equip-
ment 36 inches or less wide.
2. Be sure to install this oven only in accordance with the additional installation instructions provided.
3. It is recommended that the product be mounted to a flush wall of 2" x 4" (5 x 10cm) stud and
3
/8" (1cm)
minimum thickness drywall or plaster/lath construction. For further information, please consult the additional
installation instructions provided.
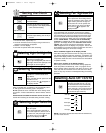
4. Make sure the bottom of the top cabinet is 66" (1.67 m) or more from the floor and 30" (76 cm) or more from the
cooking surface.
5. This oven was manufactured for household use only.It is not approved or tested for mobile vehicle, marine, or
commercial use.
30"
30" MINIMUM
66" MINIMUM
—IMPROPER USE OF THE GROUNDING PLUG CAN RESULT IN A RISK OF
ELECTRIC SHOCK.
Consult a qualified electrician or service person if the grounding instructions are not completely understood, or if
doubt exists as to whether the appliance is properly grounded.
Grounding Instructions
THIS APPLIANCE MUST BE GROUNDED. In the event of an electrical short circuit, grounding reduces the risk of
electric shock by providing an escape wire for the electric current. This appliance is equipped with a cord having a
grounding wire with a grounding plug. The plug must be plugged into an outlet that is properly installed and grounded.
• Plug into properly installed and grounded 3 prong outlet.
• DO NOT remove ground prong.
• DO NOT use an adapter.
• DO NOT use an extension cord.
WWAARRNNIINNGG
F00036Z22AP 2006.3.1 12:15 Page 5


