


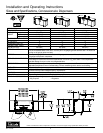
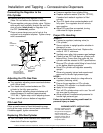

CASTER MOUNTING
PLATE MUST
STRADDLE SEAM
CASTER MOUNTING
PLATE MUST
STRADDLE SEAM
COMPRESSOR
HOUSING
CENTER CASTERS
REQUIRED ON DC4KP
(4 KEG CONCESSIONAIRE)
DRY
STORAGE
COMPARTMENT
SCREWS
Form No. Z2060A
Rev. 12.05.03
3
Perlick is committed to continuous improvement. Therefore, we reserve the right to change specifications without prior notice.
Preparing the Cabinet for Use – Concessionaire Dispensers
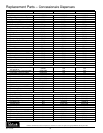
Parts List
■
Faucet Standard.
■
Faucet Head Assembly
■
Caster Set.
■
Black Connector Hose
3
⁄
16” x 3’.
■
5
⁄16” Air Hose.
■
Spanner Wrench.
■
Bag of Miscellaneous Parts.
Tools Required
■
#2 Phillips Screwdriver.
■
Spanner Wrench (included).
■
#10 Crescent Wrench.
■
9
/16” Allen Wrench.
■
3
/8” Nut driver.
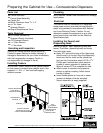
Uncrating and Inspection
Remove all crating material before operating.
Carefully inspect cabinet for hidden damage. If
damage is discovered, file your claim immediately
with the transportation company. Perlick is
not responsible for damage in transit.
Installing Casters
IMPORTANT: Attach casters to the cabinet bottom
so that caster is centered over cabinet seam. Use
supplied
1
/
4”- 20 x
3
/
4” hex head self-tapping
machine screws.
Plumbing
None required. Garden hose connections for dumping
liquid wastes.
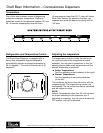
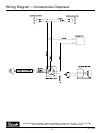
Electrical
The cabinet must be connected to a separately
fused power source (see electrical specification
plate) and grounded in accordance with National
and Local Electrical Codes. Caution: Do not
attempt to operate the equipment on any other
power source than that listed on the Electrical
Specification plate.
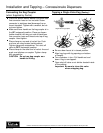
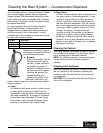
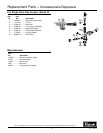
Installing the Faucet and
Dispensing Head
Before you begin: Wash dispensing head and
faucet. Flush beer, dispensing head and faucet
lines with fresh water.
■
Apply RTV around the base of the dispensing
head to seal it to the top. Align the dispensing
head over the five holes on the cabinet top
and use the five stainless steel #10-32 x 1
3
⁄4”
Phillips pan head stainless steel machine
screws to secure standard to cabinet top.
Wipe off excess RTV to complete the seal.
■
Attach faucet to standard using spanner
wrench to tighten coupling. Attach faucet
handle to faucet.
■
Insert flexible plastic air hose six to seven
inches into bottom of faucet standard.
Secure hose with tie wrap (supplied).