


Note: You can also clean these parts in the dishwasher.
4 Wipe the inside and outside of the appliance with a moist cloth.
This is an airfryer that works on hot air. Do not ll the pan with oil or frying fat.
Preparing for use
1 Place the appliance on a stable, horizontal and level surface.
Do not place the appliance on non-heat-resistant surfaces.
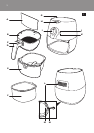
2 Place the basket in the pan properly (Fig. 3).
3 Pull the mains cord out of the cord storage compartment in the bottom of the appliance.
Do not ll the pan with oil or any other liquid.
Do not put anything on top of the appliance. This disrupts the airow and affects the hot air
frying result.
Using the appliance
The airfryer can prepare a large range of ingredients. The recipe booklet included helps you get to
know the appliance. You can nd more recipes at www.philips.com/kitchen.
Hot air frying
1 Put the mains plug in an earthed wall socket.
2 Carefully pull the pan out of the airfryer (Fig. 4).
3 Put the ingredients in the basket. (Fig. 5)
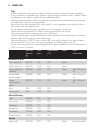
Note: Never ll the basket beyond the MAX indication or exceed the amount indicated in the table (see
section ‘Settings’ in this chapter), as this could affect the quality of the end result.
Tip: Use the separator to separate ingredients when you want to prepare different ingredients at the
same time. Place the separator in the basket and ll up each side of the basket with the ingredients.
Make sure you check the preparation time and the temperature required for the different ingredients
before you start to prepare them simultaneously. Potato cubes and schnitzel, for example, can be
prepared simultaneously because they require the same settings. Please note that the maximum amount
for each of the ingredients is half the normal amount. (Fig. 6)
4 Slide the pan back into the airfryer (Fig. 7).
Never use the pan without the basket in it.
Caution: Do not touch the pan during and some time after use, as it gets very hot. Only hold
the pan by the handle.
5 Turn the temperature control knob to the required temperature. See section ‘Settings’ in this
chapter to determine the right temperature (Fig. 8).
6 Determine the required preparation time for the ingredient (see section ‘Settings’ in this
chapter).
7 To switch on the appliance, turn the timer knob to the required preparation time (Fig. 9).
Add 3 minutes to the preparation time when the appliance is cold.
ENGLISH8