


4 Add water to the level indicated on the scale inside the inner pot that corresponds to the
number of cups of rice used. Then smooth the rice surface.
For instance, if you cook 4 cups of rice, add water up to the 4-cup level indicated on the scale.
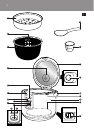
HD4738 (Fig. 3)
HD4733 (Fig. 4)
HD4728 (Fig. 5)
HD4723 (Fig. 6)
Note: The level marked inside the inner pot is just an indication; you can always adjust the water level for
different types of rice and your own preference.
5 Press the release lever to open the lid.
6 Put the inner pot in the rice cooker. Check if the inner pot is in proper contact with the
heating element (Fig. 7).
Make sure that the outside of the inner pot is dry and clean and that there is no foreign residue on
the heating element or the magnetic switch.
7 Close the lid of the rice cooker, put the plug in the wall socket and switch on the mains.
HD4728/HD4723: The cook light goes on to indicate that the appliance is on. (Fig. 8)
8 HD4738/HD4733: Set the function selection switch to RICE (Fig. 9).
HD4738/HD4733: The rice light goes on (Fig. 10).
9 Press the control lever down to start the cooking process (Fig. 11).
If you fail to press down the control lever, the rice cooker will automatically switch to the keep-
warm mode. The cook light/rice light goes out and the warm light goes on.
When the cooking process is nished, the cook light/rice light goes out and the warm light
goes on to indicate that the rice cooker has automatically switched to the keep-warm
mode (Fig. 12).
10 Open the lid and stir the rice to loosen it (Fig. 13).
For the best results, do this just after the rice cooker has switched to keep-warm mode. Then close
the lid rmly. Stirring the rice allows excess steam to escape. This will give ufer rice.
11 To end the cooking process or keep-warm mode, pull up the control lever, switch off the
mains and remove the mains plug from the wall socket (Fig. 14).
Cooking congee (HD4738/HD4733 only)
1 Follow steps 1 to 7 in section ‘Cooking rice’.
Do not exceed the volume indicated in the table for congee cooking, as this may cause the rice
cooker to overow.
2 Set the function selection switch to CONGEE (Fig. 15).
The congee light goes on (Fig. 16).
3 Press the control lever down to start the congee cooking process. (Fig. 17)
Note: Tip: Stir the congee half-way through the cooking process. This will prevent congee from sticking to
the pot.
4 To end the congee cooking process, pull up the control lever, switch off the mains and
remove the mains plug from the wall socket (Fig. 18).
At the end of the congee cooking process, the rice cooker does not switch to the keep-warm
mode.
Do not leave the rice cooker switched on too long after the actual cooking process has nished, as
this will cause the congee to turn gluey.
,
,
,
,
,
,
,
,
ENGLISH8