


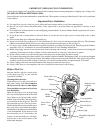

3
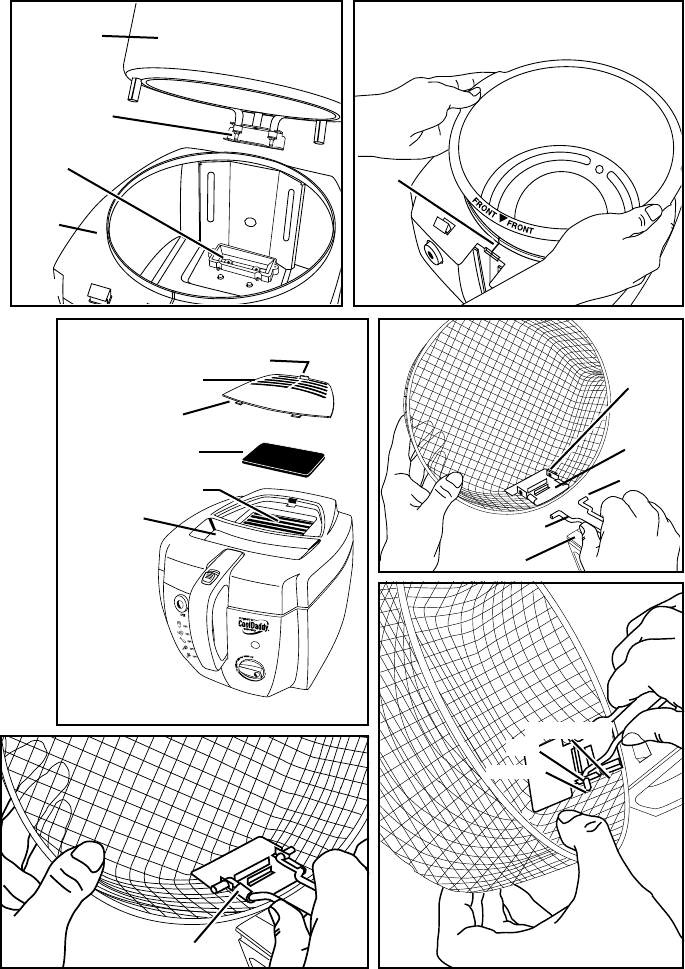
Positioning removable pot in fryer
base...
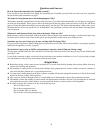
After cleaning, place the removable pot
back in the fryer base. The terminal pins
on the bottom of the removable pot fit in
the receptacle inside the fryer base (Fig.
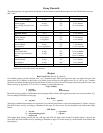
B). For easiest alignment, position the pot
in the base so the on the front of the pot
aligns with the front seam of the unit (Fig.
C). Then tilt the pot forward slightly and
push pot down into fryer base. If the fryer
cover closes, you will know the removable
pot is positioned correctly.
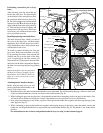
Installing/replacing removable filter...
The mesh charcoal filter, which is located in
the cover of the deep fryer, will help absorb
unpleasant odors. For the deep fryer to effec-
tively absorb these odors, always use the fryer
with the filter in the cover.
To install or replace the filter, first close the
fryer cover. Then, remove the filter cover (Fig.
D) by pushing the release latch towards the
window and lift up on the back of the filter
cover. If replacing an old filter, remove old
filter and discard. Unwrap new charcoal filter
and insert it in the filter compartment. Replace
the filter cover and snap into place by pushing
down.
Replacement filters may be purchased
through the Presto Consumer Service
Department. Call 1-800-877-0441 (see
page 9) or order on the web at www.
GoPresto.com.
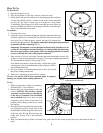
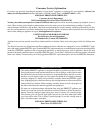
Attaching basket handle to basket...
Before using the deep fryer, you will
need to attach the basket handle to the
basket. Follow these steps:
1. Hold the basket in one hand and the basket handle in your other hand. You will be placing the pegs, which are at the ends
of the two basket handle bars, into the two holes in the basket bracket (Fig. E).
2. While holding the pegs near the peg holes, tilt the handle inward before attempting to place the pegs in their holes. (You
will not be able to fit the second peg into its hole if the handle bars are positioned too close to the bracket.)
3. Next, place one of the pegs in one of the peg holes. Then squeeze the handle bars together and fit the opposite peg in the
other peg hole (Fig. F).
4. While continuing to squeeze the handle bars together and keeping the pegs in the holes, rotate the handle towards the
basket rim, allowing the handle bars to snap into the tabs on the basket bracket (Fig. G). The handle is now in the locked
position.
For instructions on how to insert and position basket in fryer, see step 3 at the bottom of page 4.
Cover vents
Filter cover
Charcoal air filter
Release latch
Filter compartment
Fig. D
Window
Fig. G
Tabs
Fig. E
Handle
Peg
Handle bar
Basket
bracket
Peg
hole
Handle bars
Peg
Peg hole
Fig. F
Terminal pins
Receptacle
Removable
pot
Fryer
base
Fig. B
Fig. C
Front
Seam
Align with front seam. Then tilt pot
forward slightly and push pot down into
fryer base.