


5
5. Slide the basket lowering button forward to lower the basket into the oil.
6. Begin timing. Refer to page 7 for recommended times. During the first few minutes it is normal for steam to appear on
the viewing window. This will slowly disappear during cooking if the window is kept clean between uses.
CAUTION:
It is normal for steam to escape from the cover vents during frying. To prevent steam burns, keep
hands and face away from the vents.
Note: High moisture foods, such as french fries, produce more steam than other foods. The fryer is designed to ensure
that excessive moisture does not remain in the fryer. Thus when frying moist foods, you may see beads of condensation
on the exterior of the fryer. This is normal.
7. When frying time has elapsed, lift up on the basket handle to raise the basket to the drain position.
8. Depress the cover release button to open the cover. Allow the steam to vent and then slowly tilt the cover back to an upright
position being careful not to touch hot surfaces. Check that the food is golden brown. If more cooking time is needed,
close the cover and slide the basket lowering button forward to lower the basket back into the oil.
9. Once the food is done, carefully lift the basket out of the fryer. Then empty the food on absorbent paper. Season to
taste.
10. If frying additional food, close fryer cover and wait for indicator light to go out. Then repeat steps 1 through 9.
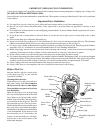
Care and Cleaning
1. Unplug cord from wall outlet and then from deep fryer and allow oil and fryer to cool completely with the cover
closed.
2. After unit has cooled completely, open cover. Lift the removable pot out of the deep fryer using the two carrying han
-
dles.
3. If you plan to reuse the cooking oil, it is recommended that you strain the oil to remove any food particles. Store oil in a
tightly sealed container and keep where it will not be exposed to heat or direct light.
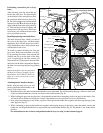
4. Detach the basket handle from the basket and wipe handle with a damp cloth to clean. To detach the basket handle for
cleaning, squeeze the handle bars together and tilt the handle towards the interior of the basket. While continuing to
squeeze the handle bars, remove the pegs from the peg holes.
5. Wash the frying basket, with the handle removed, and the removable pot with warm water and a mild detergent. Rinse and
dry thoroughly. Do not use steel wool scouring pads or abrasive kitchen cleaners on the removable pot or the cool-touch
base. The frying basket, with the handle removed, may be washed in the dishwasher, if desired. Washing the removable
pot in a dishwasher is not recommended. If you choose to wash the removable pot in a dishwasher, the exterior of the
removable pot will likely discolor due to the caustic nature of the dishwasher detergent.
Note: After multiple uses, the nonstick finish over the element may darken. This is normal and will not affect the nonstick
properties of the release coating.
6. Never immerse the cool-touch base in water or other liquid, or wash in a dishwasher. Wipe with a damp cloth to clean.
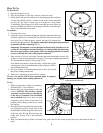
7. After each use, wipe the inside of the fryer cover with a damp cloth. For a more thorough cleaning, remove the cover
from the fryer base by opening the cover and then lifting it straight up.
Press the release latch on the filter cover (Fig. D, page 3) and remove the filter. The filter should not be washed. Wash
the cover in hot, soapy water; rinse and dry. Do not wash the cover parts in the dish-
washer. Dry the cover in a vertical position to allow water to drain out. Once the cover
is thoroughly dry, reattach it to the fryer base.
Always remove the filter before immersing the cover in water.
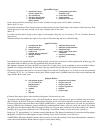
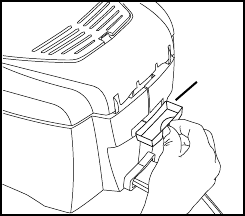
8. On the back side of the deep fryer is a slide-out drip cup (Fig. L). This cup collects
condensation from the fryer cover when the cover is opened after frying. Empty the drip
cup after each use and replace in fryer with the rib side out.
9. Store the cord in a clean, dry location away from metal objects. Always check the mag
-
netic plug before use to assure metal items have not become attached.
Fig. L
Drip cup